
Vice President Jersey Infrared Consultants, Level III Certified Infrared Thermographer
Jersey Infrared Consultants, PO Box 39, Burlington NJ 08016
Ph: 609-386-1281
www.jerseyir.com
Abstract
A successful infrared electrical inspection starts before you leave the office. The success of any project depends on planning, preparation, and attention to details. It also includes clear communication of expectations while you are on-site, and comprehensive collection of data during the inspection.
 This presentation is based on the lessons learned from daily operations of a successful infrared inspection firm. It will cover a comprehensive checklist used prior to leaving for the job site, give examples of communications with on-site personnel, discuss some of the “unexpected” challenges you could encounter, as well as safeguards used to ensure data is collected in a format that allows for timely and accurate report generation.
Discussion
 Infrared Electrical surveys are one of the most common applications of infrared thermography. However, performing your first infrared electrical survey can be an intimidating undertaking. This paper outlines the step-by-step procedure followed on a daily basis by Jersey Infrared Consultants’ thermographs.
During a typical year, Jersey Infrared Consultants perform over 1100 man-days of infrared inspections. Typical facilities surveyed includeskyscrapers, healthcare, manufacturing, and petrochemical refineries. The electrical equipment can be AC or DC and vary in age and size.
Before beginning an IR Electrical survey, the thermographer must have a thorough understanding of the electrical system, its components, and how each part will affect results of the infrared survey. Below are some of the basics that must be understood.
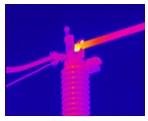
- Electrical current flowing through conductors generates heat
- Similar components with similar load should be the same temperature
- Increased resistance will generate more heat, resulting in electrical defects and accompanied by temperature rise
- Keep in mind that some defects may result in lower temperatures
- Emissivity affects the results
- The appropriate infrared imager and accessories must be selected
- The thermographer cannot determine the cause of the problem
- Thermography cannot predict how long before failure occurs
First Things First
 The first step to a successful Infrared Survey is proper planning. The initial communication with the job site representative should include a review of the date the project is scheduled, site access and list of equipment to be surveyed.
If an existing equipment inventory list is not available, you may want to provide the job site rep with a guideline of equipment to consider including in the survey.
This is also the time to ask about any special concerns such as reported problems or electrical issues, changes that have been completed since the last survey or are planned for the future, and special documentation requirements, if any.
Follow Your Checklist
To avoid lost days and embarrassment at the job site, establish a checklist to complete before you leave for the job site. Even our most experienced thermographers, who have completed hundreds of successful surveys, follow a checklist.
Verify Job Site Information
____Contact name and phone
____Parking and site entrance
____Confirm who you may report to and talk to on site
Review the Scope of Work
____Bring a printed copy of any previous surveys or provided documentation
____Have a hard copy of site contact information
____Do not rely on Wi-Fi or internet access
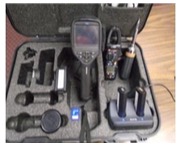
Gather all Infrared Equipment
____Correct imager with necessary lenses and accessories
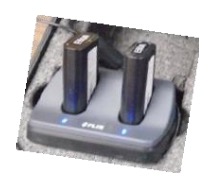
____Charge batteries and pack a charger with cables
____Confirm memory card is installed and has available memory space
____Include the Statement of Calibration
____Daylight camera with extra batteries and memory card
____Ammeter
Additional Paperwork and Clearances
____Photo ID and proof of citizenship
____Documentation of safety training and drug screen results
____Copy of Certificate of Insurance
If Driving a Vehicle to the Site
____Confirm if the vehicle must be marked or unmarked
____Is off road access necessary
____Parking restrictions (vehicle size/type or registration)
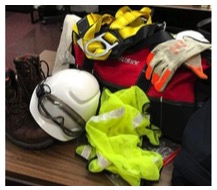
Check Safety Equipment – consider storing safety equipment in a large duffle bag to ensure it is in one place and in good condition
____Basics – hardhat, eye protection, steel toe boots, hearing protection
____Special equipment – gas meters, razor (no beards), hairnets, safety vests
____PPE – FR clothing, respirator
 It is important to get the survey off to a good start. If you are late, the day is off to a BAD start! Consider taking printed directions and allowing additional travel time (traffic and detours always occur when you can least afford them). Once you have arrived on site, it is likely that additional time will be needed to complete sign-in. It is common to need a photo ID, provide copies of drug testing and safety training, complete site specific training and even to have the imager and equipment inspected.
The initial meeting with the site contact is critical. After introducing yourself, verify the scope of work to be completed. Review the equipment to be surveyed, any special access or timing, and the purpose of the survey.
Establish how serious problems are to be handled and who should they be reported to.
Time to Start Scanning
Take a deep breath and remind yourself of the following basic rules:
- Do not allow yourself to be forced into an unsafe situation
- Do not overstep your authority
- Stay within the scope of work
- You control the pace of the survey – record all information before moving to the next location or site
Complete and accurate documentation of the results and findings of the infrared survey is essential to meet industry standards and provide the final report for the client. Set a process for recording data that works for you and the current situation. For example, begin with the equipment to the right of the door and continue clockwise through the area. If you are working from an existing inventory list, go item by item, marking your list as you complete each piece of equipment.
 If you are unsure of a piece of equipment, take a control photograph for later reference. Another option is to ask your assistant how they refer to an area or piece of equipment.
If allowed, attach a sticker to the first piece of equipment in the room to provide a quick visual confirmation that the area was included in the infrared survey. This sticker can also act as a reminder to site personnel to schedule the next survey.
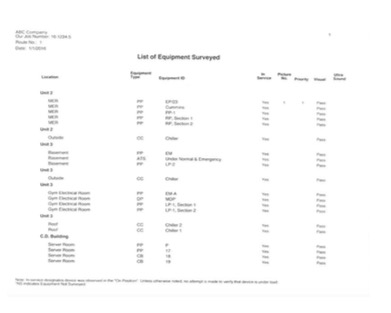
When documenting equipment, be sure to comply with industry standards as well as any specific needs of the client. Data needed to meet current industry standards includes:
- Location 1: Floor or building
- Location 2: Room or closet
- Type of equipment
- Equipment ID
- Status at the time of the Survey
- In service
- Visual
- Problem located
Remember that you must control the pace of the survey. Do not move to the next location until you are satisfied that you have collected all the data needed. It is very unlikely you will have the opportunity to return to gather additional information.
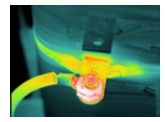
You Located a Thermal Anomaly
 Stop – do not proceed any further until this problem is documented. Record at least one variation of the thermal image, along with the control photograph. Note the thermogram ID(s) and control photo number on your paperwork.
Complete all fields of the electrical form before you move on. To meet industry standards, the electrical form should include distance, ambient temperature, emissivity, rated and measured loads, and observed temperatures of the anomaly and related equipment. Double check your imager and camera to be sure the images are recorded and stored properly before moving on.
Do not forget to take a normal thermogram or two early in the survey. In case no anomalies are found, normal thermograms ensures that your report will have data and photos to show the client. If you are in doubt of what you are seeing, record the data. It can always be deleted upon further review.
Write (or record) all your notes from the job at the time of the job. Do not rely on your memory. Note any access issues, unusual events, or deviations from the scope of work. To help generate possible future work, record any areas that were not included in the survey or any additional opportunities (roof leaks, condensate discharge, etc.).
Keep Accurate Notes
It is important to remember that ALL field notes are part of the legal documentation for your survey. Keep all notes together. Do not add any notes or notations that are not related to this project.
Before Leaving the Site
 When the site representative or assistant notifies you that all the areas to be surveyed have been inspected, you are not done. As was done when leaving to go to the job site, develop a checklist to be completed before leaving the job site.
Verify ALL Paperwork
____Make sure all is complete and correct
____Store the paperwork in a safe location
Account for All Equipment
____Imager, batteries and accessories
____Account for all safety equipment
____Daylight camera
Meet with the Site Contact or Designee
____Confirm all areas were surveyed and the scope of work has been completed
____Discuss thermal anomalies located, specifically serious problems
____Confirm when the client should expect their report
____Mention any additional IR opportunities
Back at the Office
As soon as you arrive back at the office, process your data immediately, while the project is fresh in your mind.
 Backup the thermal images and controls to an external site (computer, USB, or cloud). It is our practice to backup the images and store a second copy on another device. Once you have confirmed that the images are backed up safely, clear the memory card.
Take the time to care for your equipment. Replace any supplies that were used, place batteries on charge, and clean, inspect and repack your safety equipment.
If you are the person generating the inspection report, complete the report immediately. If another person processes the report, be sure your paperwork is complete and legible. After the report is processed, read the report before signing it. It is a legal document and your name – and reputation – is on it.
Conclusion
The step-by-step outline above has been developed by Jersey Infrared Consultants and is based on more than 30 years of experience performing Infrared Electrical System surveys. We encourage fellow thermographers to start with this outline and modify it to their specific needs.
