Infrared Inspection Data: What’s Hot and What's Not?
Scott Cawlfield
Logos Computer Solutions, Inc.
3801 14th Ave. West
Seattle, WA 98119
206-217-0577
Abstract
As infrared cameras get cheaper and easier to use and become more prevalent in a greater range of applications and corporations, there is a risk that some people will simply buy an infrared camera and call themselves thermographers. Owning an infrared camera doesn’t make one a thermographer, any more than owning a stethoscope makes one a doctor. There are four essential tools needed for the professional thermographer:
1. A good infrared camera (and digital camera combined or separate)
2. Infraredtraining
3. Experiencein-the-field
4. Standard methodologies for conducting the infrared inspections
There are several good training companies that can show you why training is essential for a professional thermographer. This paper addresses the fourth point — infrared inspection methodologies: what to test, when to test (scheduling), equipment prioritization, additional factors, and data collection methods. The last section will discuss cost benefit analysis and other reports and that can be derived when standard data collection methodologies are followed.
Methodology #1: What to test and when?
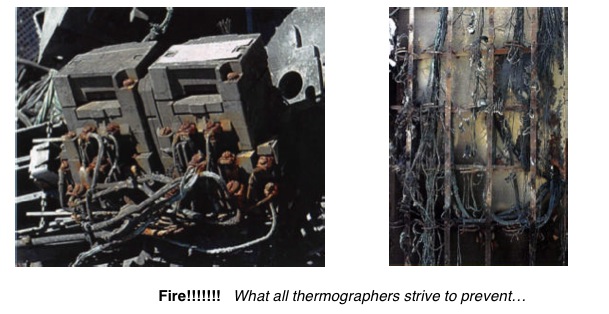
The first question of “what to test?” is answered by creating and using an equipment inventory. The equipment inventory is the cornerstone for infrared inspection accountability. By keeping a working inventory list, you can pick any piece of equipment and know when the last time it was tested. Once you have a failure or fire, people tend to look for a scapegoat and that is when your boss will ask you when was the last time that piece of equipment that burned up was tested. Hopefully, you will not have to say, “I don’t know?”
The equipment inventory can be created in several ways. It can be recorded on paper during the inspection and once back in the office, transcribed into Excel or a database program. The inventory can also be printed from an existing Computerized Maintenance Management System (CMMS) or it can be entered into an infrared PdM database program while the inspection is being performed. Without an inventory, the thermographer cannot give an account of what was tested and what was not. A piece of equipment can go for years without being tested if no inspection record is kept. If you are a customer hiring a thermographer, you should expect an inventory list of equipment tested and what was not tested. It costs very little to build the inventory up front compared to the risk of not testing some critical pieces of equipment and having them fail or burn.
By recording the test status of each piece of equipment in the inventory list during the inspection, the thermographer can answer the question, “what did you inspect?” To provide full accountability, test status information sho uld include:
• The current test status
• The date the equipment was last tested
• The results of the last test
• If it was not tested during the last inspection, why not?
• And if the equipment is not tested this time, when is it due to be tested again?
A sample notation currently used in the field for test status of equipment is as follows:
TBT: To Be Tested: – starting test status for all equipment.
TESTED: Tested:
NTNL: Not Tested No Load: – commonly used since not all equipment will be running during the inspection.
NTTC: Not Tested Time Constraint: – It was scheduled to be tested but time ran out.
NTNS: Not Tested Not Specified: – a piece of equipment was not scheduled to be inspected.
NTUR: Not Tested Under Repair:
Once an inventory is created, it is advisable to assign a criticality to operations value to each piece of equipment. This helps answer the “When” question when prioriti zing equipment for testing schedules and repair priority when a problem is found.
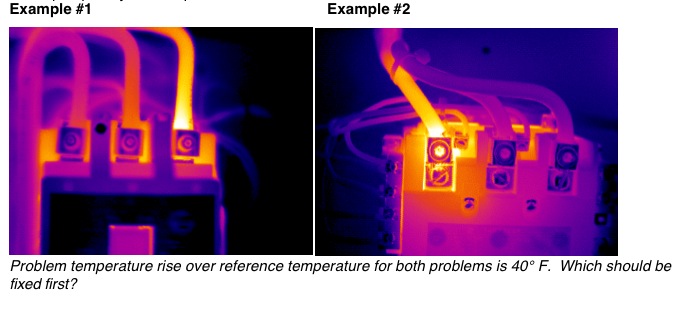
It would help to know that Problem #1 is controlling non-essential equipment and Problem #2 is controlling machines on the main plant floor which is critical to operations and should be fixed first. Here is a sample of a criticality to operations list and the corresponding inspection schedules set for each. This example will need to be customized depending on the industry and the equipment.
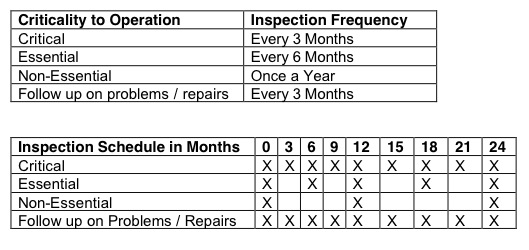
Once an inventory is setup and inspection test statuses are integrated, the infrared program has the basis for accountability. Add to that the criticality to operation criteria and you get a prioritized inspection schedule and repair list. Bar-code labels on the equipment can be very helpful in streamlining equipment inventory management. Without a basic equipment inventory, there is no accountability, no prioritized inspection scheduling, and basically no reliable infrared program.
Methodology #2: What pertinent data should be recorded?
Once an inventory is set up and the equipment to test has been determined, we can turn to the actual inspection and ask, “Besides recording the temperature of the problem and the reference, what other information is perti nent and should be recorded? Other than the image being in focus and the emissivity value, what other factors could greatly influence the temperature measurement?”
One factor is the equipment load; whenever possible it is important to measure and record load data. As Bernard Lyon stated in his paper “Temperature is certainly an important factor in evaluating equipment. However, if you follow the guidelines that are based solely on absolute temperature measurement – or on a temperature rise (Delta T) – you run the risk of incorrectly diagnosing your problems. The consequences of such actions can lead to a false sense of security, equipment failure, fire and even the possibility of personal injury”.(1)
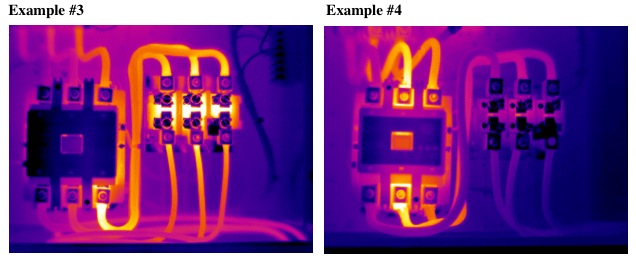
These two problems have almost identical 30° temperature rises in respect to the reference temperature. Which one has morepotential to become a major problem? A thermographer cannot tell unless he measures the load on the equipment. Example #3 is running under 60% of the manufacturers rated load and Example #4 is running under 10% of the manufacturers rated load. Although both examples are problems, Example #4 definitely has more potential to become a greater problem.
Another factor that should be recorded is wind speed. As shown in the wind effects experiment done by Robert Madding and Bernard Lyon, “the temperature rise was cut in half with just a little over 3 m.p.h. breeze” *(2). The options available include buying an anemometer for $100 to try to accurately measure the wind speed, or guestimate by picking up grass, drop it and estimate the wind speed. For many outdoor environments, the wind speed will have to be a n estimate since even with an anemometer, you might not be very close to the piece of equipment being inspected. This is especially true regarding power li nes. The important point being made is to account for wind speed by the best available means, and record it. This data is especially crucial if you are doing baseline trending on a problem.
Another notable factor is environment. Was it a hot sunny day, rainy, snowing, or clear but freezing. Environmental factors such as solar loading or a cold rain can effect temperature measurements. Again, this is especially crucial if you are trying to do baseline trending on a piece of equipment located outdoors. What was the weather like the last time the inspection was done? How does this correlate to the temperatures measured?
Equipment load, wind speed, and environment are not the only factors that are important to note but should be strongly considered when documenting a problem. Other information that is less important to the thermographer but may be more important to the management is recording the manufacturer and type of fault for each problem found. This allows one to analyze reliability by manufacturer and/or equipment type. By comparing the cost of repairing observed problems, we can look at the impact by manufacturer on the total operating expense of a facility. This, in turn, allows one to improve future buying decisions.
Methodology #3: Data collection techniques
The infrared camera is just a tool and the thermogram is just the starting point in the data gathering process. The next step is to establish methods to ensure the right data is collected efficiently. These methods should define procedures to guarantee that the data quality is consistent from inspection to inspection and/or from thermographer to thermographer. These methods must not impair the pace of the inspection but should help in expediting the collection of data and aid the thermographer in his ability to better diagnose problem conditions in the field.
For many years now, the simplest and cheapest way to record data is manually on paper. If this is the method that is used, preparing pre-printed problem write-up sheets with blank data fields will increase consistency and standardize problem write-ups. When used in conjunction with an inventory list produced by Excel or a CMMS program, this is a starting point of a standardized infrared inspection system. This method of manual data collection works if labor costs are relatively inexpensive.
Another method that has been used for many years is recording problem write-ups with a voice dictation recorder. Although both paper and dictation methods are convenient, there are pitfalls to using either method. In both instances, there is the risk of losing data and errors generated from misinterpreting field notes when typing up the reports at the office. Furthermore, the thermographer in the field does not have in his hand the analysis capabilities of the past problems and other information when it is of most value to him in doing his job.
With the advancement of pen computers, PDA’s, and database software, a third method of data collection has evolved. Instead of trying to bring the field data back to the office and enter it into the database on the computer, bring the computer into the field to have the data entered directly into the database during the inspection. This has proven to be a very reliable method of data collection for the thermographer today as well as the most cost-effective solution over time for an infrared PdM inspection program.
One additional efficiency of the mobile database is the near instant turn-around time of report generation. Since all of the necessary information is put into the database at the time of the inspection, once the images are transferred to the pen computer, the reports can be printed immediately at the end of the inspection. It has been shown that by utilizing a pen computer with an infrared PdM database in the field, a thermographer can double the number of problems written up in a day (from 50 to 100 problems), and almost completely eliminate report generation time.
Typical time of inspections and report generation is as follows: (*including inventory of equipment and associated test statuses, prioritized list of problems, and Documentation)

Another efficiency with a database on a mobile pen computer or PDA is that it will yield more consistent inspection results because testing procedures can be methodically followed. Key information can be simply selected from drop down menus in and never transcribed. Past problem conditions on a chronic problem are immediately displayed and can be reviewed in the context of the newly documented problem. Furthermore, the redundancy of data collection can be eliminated because information that was stored in the past, such as location, does not need to be re-entered into the database. Maps, work orders, inspection procedures and other pertinent documents can be brought into the field since the database also can work as an Electronic Document Management System (EDMS). This is extremely efficient since there is no typing and no syntax problems while improving data accuracy. This method has many benefits over previous conventional methods since data is entered only once.
Data Analysis
Now that the inspection has been completed and the data collected, what analyses can we see from following these methodologies using software to ensure write-up consistency? Equipment failures often have financial consequences that extend beyond the cost of replacing or repairing the damaged components but defining this cost is very hard. In some cases the cost of the component is the lesser of the expenses. Production downtime can sometimes far outweigh the cost of replacing the equipment or component. Trying to make a case for what can happen is difficult unless you provide examples of what has actually happened. Historical data can provide a bridge from the theoretical to the real world.
We see interesting statistics below from claims data provided by Hartford Steam Boiler (HSB) on a variety of failure types and their frequencies showing a majority of failures from “Electrical Connection, Inadequate/ Improper” *(3)
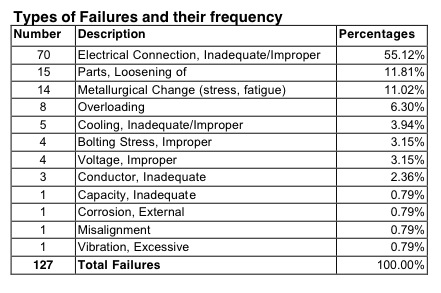
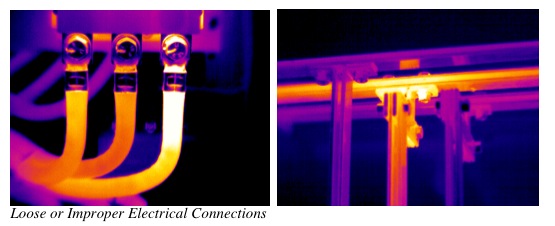
Of the 127 total claims from HSB, 85 claims or 67% were for “Inadequate/Improper Electrical Connection” or “Loosening of Parts”. Of the total dollar claims made from this sample ($25,835,957), 66% or $17,053,130 was from claims made resulting from “Inadequate/Improper Electrical connections” or “Loosening of Parts”. Infrared cameras and trained thermographers are the ideal tools for detecting these kinds of basic problems before the failure occurs and the cost to repair inadequate electrical connections is relatively inexpensive to fix. This means a majority of problems found can have a cost savings if you fix the problem before it fails or burns up since it is usually much cheaper to clean and reattach a connection than replace the equipment itself. Over time, by tracking these cost savings problem by problem, you can justify the cost of your infrared program.
Tracking Cost Benefits of your Infrared Program
For the company who wants to track the cost benefit of their own infrared program, you will need a list of what your equipment costs, and a standard hourly repair rate. You can enter this once into the computer or enter it manually for each problem. This will produce a running total of the conservative cost saving for the company as a result of the infrared program. Several example are shown below:
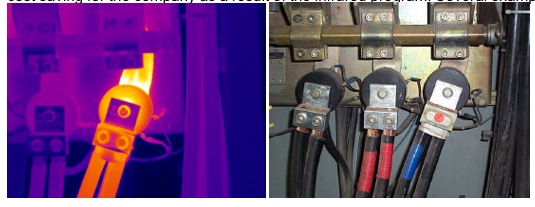
The conservative cost saving to fix this problem before failure versus after failure is based solely upon hard dollar figures of parts and labor.

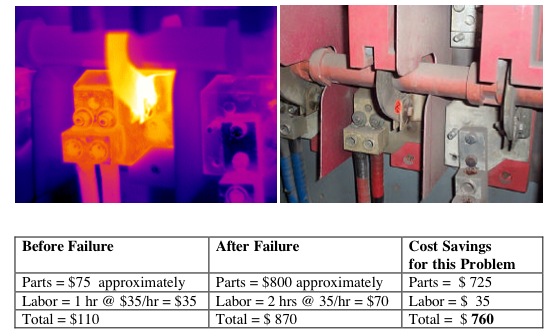
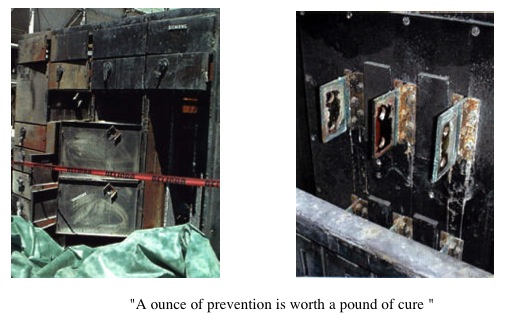
These examples of cost savings are extremely conservative since the actual damage afterward could easily range from $2,000 if not much else goes wrong to the entire MCC burning up, in the worst case, and costing around $200,000 (and maybe more).
An annual summary of cost savings can be generated from recording this data. For example, out of 55 industrial manufacturing sites, the cost of the inspection service was just over $100,000 and a total of 976 problems were documented. A cost benefit analysis on the 976 problems shows a “before vs. after” failure savings on materials and labor alone of $408,040.00. These figures give us a conservative return on investment of 1:4. The average cost saving per problem worked out to be $418.07 in this example. These figures will vary depending on your equipment and this number is very conservative and does not take into consideration the potential loss to revenue or loss to production nor the risk of financial loss from a major fire.
By using this system of simply comparing parts and labor “before” versus “after” failure, we can see the real hard dollar savings of implementing and justifying an infrared PdM inspection program. This 1:4 cost savings ratio was calculated from data gathered using InspecTrend (formerly called Thermal Trend), an infrared PdM inspection management database. Later, this ratio was independently verified by Hartford Steam Boiler (HSB) with their own data and calculations. HSB also verified that if you take into consideration loss to production, spoilage, extra expenses, etc. that this cost savings ratio on average can be closer to 1:20, depending on the industry. *(3)
Summary
Whether a thermographer uses a pad of paper, PDA, or a pen computer, the data and methodologies followed are important for creating a successful, standardized infrared PdM inspection program. Sufficient training and in-the-field experience cannot be emphasized enough as a basis to build a solid infrared program. Once those components are in place, data collection methodologies such as creating a basic inventory list are important for developing accountability and the aim of getting uniform results across multiple inspections and multiple thermographers. Without an accountable, comprehensive infrared PdM inspection program, unnecessary failures and losses will continue to occur. By setting up a standardized infrared PdM inspection program and tracking the pertinent information and recording it consistently, one can manage and see the trends in the overall health of a facility. There is a wealth of information to gain and analyze by using these methodologies and implementing them can even cost justify your job or infrared program. Equipment will always fail and human error will always be a factor, so good thermographers will have job security as long as they can show their worth in bottom-line, real dollar savings to their customers and employer.
References
(1) “The relationship between current and load and temperature for quasi-steady state and transient conditions.” By Bernard R Lyon Jr. and Gary L. Orlove, and Donna L. Peters presented at Thermosense XXII, April 2000.
(2) “Wind effects on electrical hot spots – some experimental IR data” by Robert P. Madding and Bernard R. Lyon, Jr. presented at Thermosense XXII, April 2000.
(3) ” Cost Benefit Analysis of Infrared Programs ” by Sandy Sanor – Hartford Steam Boiler Thermography Services and Scott Cawlfield – Logos Computer Solutions published in Maintenance Technology, June 2001, p. 14.
KEY Words: Infrared, inventory, accountability, repair costs, business interruption, manufacturing, cost benefit analysis.
Advertisement


