Infrared Inspection Windows: Where Do I Start?

Martin Robinson, Managing Director
Global Maintenance Technologies
Chelford Court, Robjohns Road
Chelmsford, Essex CM1 3AG, UK
Ph: 011-44-0-1245-500-460
Abstract
Due to the nature of electrical switchgear, 90% of the components that a thermographer wishes to inspect are normally behind cabinet doors, switched interlocks, etc., making it impracticable for the thermographer to safely and routinely inspect live switchgear.
The recognition and adoption of the safe working practices outlined in NFPA 70E have led to the acceptance of IR windows as an approved, safe method that allows live inspections to be completed while ensuring that the thermographer is safe.
However, there is still a lot of confusion regarding the implementation of IR windows into a thermographic inspection program. The most common questions regarding IR windows are:
-
How do I work out where to put the windows?
-
How many infrared windows do I need?
-
What can I see through an infrared window?
-
How do I use infrared windows?
Infrared inspection windows are a real benefit to a thermographer. They make our work safer, faster and more accurate, but only when installed and used correctly. This paper will discuss in detail the points outlined above and dispel some of the most commonly held misconceptions regarding IR windows.
Infrared Windows! Where Do I Start?

The most common questions we are asked at G M Tech are:
-
How do I work out where to put the windows
-
How many infrared windows do I need
-
What can I see through an infrared window· How do I use infrared windows
This paper will deal with each of these issues individually.
How Do I Work Out Where to Put the Windows?
The first thing that you need to do is identify the targets that you want to look at during your infrared survey. Traditional surveys commonly only look at the bolted connections within the switchgear as these are considered the “weakest points” or the “points most likely to fail”. These may include:
-
Cable connections
-
Bus bar connections
-
Isolator or circuit breaker connections
-
Etcetera
It should be noted that infrared windows are also installed to allow thermographers to monitor many other things, from R & D on critical component temperatures within an assembly to load characteristics / phase imbalance across breakers, etc. However, for the purposes of this paper we will be concentrating on the bolted connections of a generic piece of switchgear.
Stage 1
Safety First. You will need to isolate your switchgear to allow safe access to the internal components. This inspection will allow you to identify what you wish to inspect inside the panel and allow you to gather all relevant measurements needed to complete the calculations required to find the FOV.
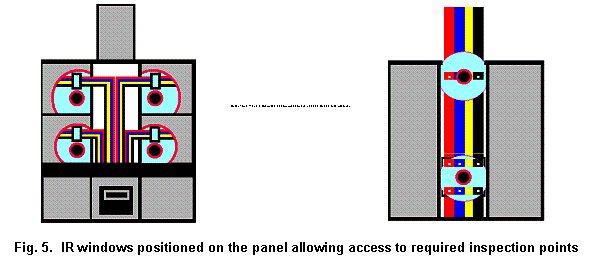
Below is an illustration which demonstrates inspection points that you may want to consider when installing IR windows. Another important point is that you may need to install IR windows in the front and rear of the switchgear, (rear windows typically allow access to the main breaker connections, bus bar connections, etc.)
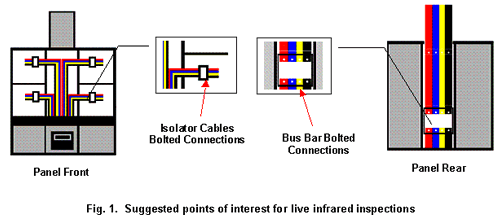
Note: At this point you should make every effort to standardize the target emissivity through the use of paint, electrical tape or the G M Tech IR-ID® Label System (who knows when you will be able to power down again). Also, take as many digital pictures as possible – these can be used for your report templates and for future reference. In fact, some companies even place laminated copies of these pictures by the IR windows.
If you cannot power down for this inspection, speak with the switchgear manufacturer regarding your particular range of switchgear. They are normally very keen to help and may have drawings, pictures, etc. that they can let you have copies of to allow you to calculate the number of windows that you require. You will also be able to rely on your own knowledge or your maintenance engineer’s knowledge of your switchgear to help you decide where you want to place the IR windows, especially on established distribution systems.
Stage 2
 Once you have decided on what you want to see through your IR windows, the next thing that you will need to do is decide what size IR window you require and where you need to install it to ensure maximum coverage and therefore maximum efficiency.
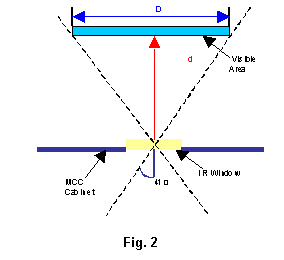
The formula for calculating the field of view (FOV) through an IR window is:
2 x [(tangent of 1/2 the angle) x distance]
Typically, infrared cameras have a standard FOV of approximately 24 degrees, in the horizontal, and 20 degrees in the vertical. It is advisable to only complete your calculations to the standard lens FOV, even if you have wide angle lenses.
Another important consideration is that you can manipulate the camera when looking through an IR window. This has the effect of increasing what you can see by up to a factor of 3, which means that if your target is 12 inches across you can reduce this to 4 inches (for IR window size calculation purposes) to allow for the additional area you will see when you manipulate the camera from left to right or up and down.
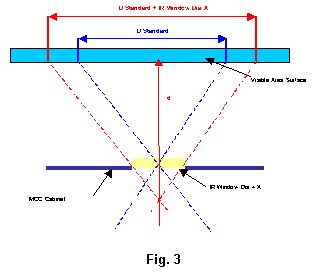 A very important point to note when you calculate an FOV is that the distance from the cover to the target (d) comes back to a single point (see fig. 3) and does not take into account the size of the window, camera detector array, etc. This means that if you calculate the FOV at 2.8 inches, using an IR window of 2 inches would give you a target (D) of approximately 4.8 inches, moreover a 4 inch IR window would give you a target (D) of approximately 6.8 inches.
This emphasizes why it is important to understand the functions of your camera lens FOV, number of required IR targets, cabinet depths, etc. A rule of thumb is that the closer the target component is to the cabinet cover the larger the IR window required.
Tip: Some thermographers find it easier to let the camera show them what it can see rather than completing a number of calculations. The following procedure is a quick method of working out what you can see at set distances with your own equipment and lenses.
- Place a piece of paper on a flat, even surface and mark out a line with increments of 2 inches up to approximately 24 inches
- Place the camera lens at the 0 datum line
- Using a heat source (finger, warm coffee cup, etc.) move the object in from the left hand side outside the visual frame until it can be seen and mark the paper, repeat the same procedure for the right hand side and mark the paper (see fig. 4)
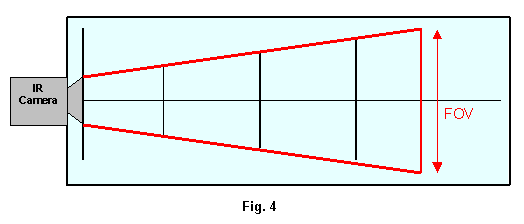
- Measure the distance between the 2 points and this will give you what you can see using the camera and lens at a set distance.
- Note: Once you have worked out the FOV distance that you can see, you will need to add on a factor to take into account the IR window that you intend to use. This is done by subtracting the camera lens diameter from the FOV and adding the IR window diameter that you intend to use. For example:
FOV of a 24 degree lens at 16 inches as measured using the above process = 8 inches. The camera lens = 1.75 inches, thus the FOV of the camera = 6.25 inches.
· Using a 2 inch IR window would give an approximate FOV of 8.25 inches
· Using a 3 inch IR window would give an approximate FOV of 9.25 inches
· Using a 4 inch IR window would give an approximate FOV of 10.25 inches
- Note: Once you have worked out the FOV distance that you can see, you will need to add on a factor to take into account the IR window that you intend to use. This is done by subtracting the camera lens diameter from the FOV and adding the IR window diameter that you intend to use. For example:
- Most thermographers measure a point at 18 inches and then join the points together at the increments marked on the paper. They then keep a chart with their camera for easy reference.
Note: Although the above technique is not 100% accurate, it gives an extremely good result. Try it for yourself; it is a simple technique that really works well!
Once you have identified what you want to see, calculated the FOV of your camera and identified the IR window size that you need, it is time to fit them. Be aware of internal obstacles (cables, internal covers, Perspex / Plexiglas). These may need to be removed or modified to allow you access to your targets. This is extremely important when putting IR windows into brand new switchgear prior to installation into a building. Make sure that the contractors installing the cables do not route the cables in front of your IR windows as this will render them useless.
How Many Infrared Windows Do I Need?
As discussed, once you have identified your required components and FOV calculations, you will be able to identify fairly accurately the number of IR windows that you require; however, do not fall into the habit of installing the largest window that you can. Take the time to calculate as best you can the best window for the job at hand.
Remember, the larger the window the greater the cost! And, if you are working on a limited budget you may end up running out of funding before installing all the IR windows you require to cover everything that you want on your IR inspection route.
What Can I See Through an Infrared Window?
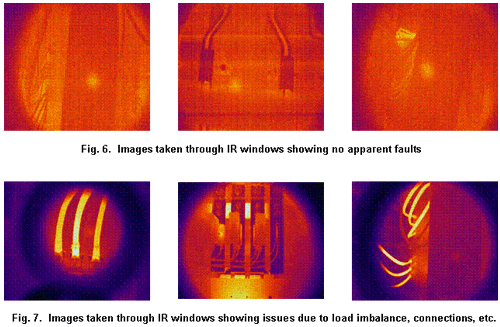
An infrared window allows you to inspect the inside of an electrical cabinet to check the physical condition of the components that you have chosen to inspect. As with traditional thermographic inspections, we can see temperature differences very clearly. However, when trying to survey components that do not have any faults, are under very little load, and are at the same temperature, you will see very little if anything at all!
You need to have confidence in the infrared windows that you are using. They are designed to allow infrared energy to transmit through them at a known transmission rate, therefore, if there is even a slight temperature difference, you will be able to see that with your IR camera and be able to record images for the IR inspection trend analysis program.
How Do I Use Infrared Windows?
An important thing to remember when using IR windows is to identify the window with a unique number. This will be invaluable, especially when you have multiple windows on electrical panels. It is also advisable to identify the type and wavelength of the infrared window material.
The most essential data to record are the transmission rate of the crystal and also the emissivity of the component or components that you are measuring through the IR window. The most effective way of using IR windows is to, where possible, prepare all components that are inspected so as they have the same emissivity with electrical tape, paint, etc. Thus, all components being inspected will have the same transmission rate and emissivity readings. Consequently, the results gathered will be more accurate.
It should be noted that there may be multiple targets through the IR window. These need to be recorded on the ID label. The most common method of locating the targets required is by using the clock face method, i.e., bus bar connections at 4 o’clock. These data can all be placed on labels, examples of which are shown in figure 8.
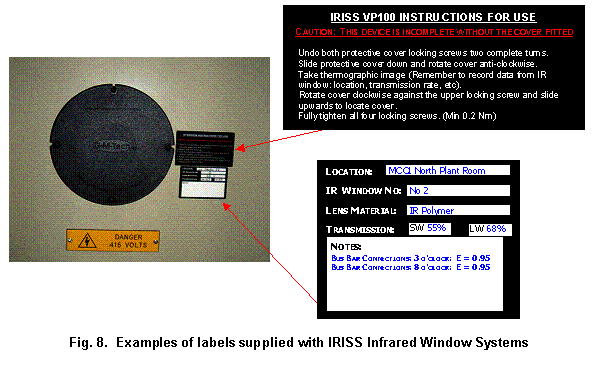
Note: Some cameras do not have the ability to adjust the external optics transmission, therefore, thermographers use the emissivity setting on the camera to offset for transmission and emissivity losses. The formula for this is to multiply the target component’s emissivity by the IR transmission of your IR window. If you are using this technique, you can use the labels to record the emissivity setting for the camera when using the specific window.
Conclusion
This document contains some helpful hints to assist you in your installation of IR windows. However, more detailed information may be found at www.g-m-tech.com, or alternatively, you can send an email to
Advertisement
