
Bill Warner
Education Director for the National Association of Commercial Building Inspectors & Thermographers™
BC Warner Inspections & Thermal Imaging Services
Greenville, OHPh: 937-423-2949www.daytonthermalinspection.comwww.bcwarner.comIntroduction
With the proliferation of an enormous selection of thermal imaging cameras available on the market today, inspectors who consider adding thermal imaging to their inspection services continue to ask this seemingly age-old question: “Which camera should I choose?” Manufacturers continue to release new models and discontinue older ones. Complicating matters, the model specifications and features listed by the manufactures appear “Greek” to the novice and beginners. To muddy the waters even further, misinformation and inexperienced or grossly uneducated opinions are abundantly strewn about the internet for this widely debated topic on social media sites and message boards. To top it all off, manufacturers, retailers, and individuals often refer to seemingly authoritative sources that have diluted specific equipment needs through publishing and proposing superficially general “minimum equipment requirement” standards without also noting other important qualifying factors.
Based on price point alone, one can easily discern that not all infrared cameras are the same. Even though prices have dramatically fallen, the imaging technology and related features have vastly improved over the past few years adding to the difficult purchase decisions one is faced with. Choosing wisely when investing in equipment for your business is no easy task. This is especially true for residential and commercial building inspection applications which are proven to be one of the most complicated and “all encompassing” applications known to thermal imaging. Purchasing the “right” thermal imaging camera is a big commitment full of complicated choices. Preparing yourself with as much education and knowledge as possible before the purchase can provide some much needed clarity.
One for All Doesn’t Exist
Many an experienced thermographer will tell you that no single infrared camera is ideally suited for all applications. This holds true for building inspections in general, but a few do come close to the mark. In order to narrow the field, one must carefully define the intended purpose(s) for the infrared camera. On the surface, this seems to be an easy task for the general building inspector. Upon closer scrutiny, great difficulty in defining the numerous building inspection related applications one intends to perform with the camera is often encountered.
Most inspectors are performing inspections that require knowledge of multiple disciplines and systems associated with residential and commercial buildings. For example, it’s rare to find that inspectors seeking to add thermal imaging to their services have narrowed their business model to strictly weatherization, electrical contracting, or water damage restorations; or intend to solely use the infrared camera for such independent applications. Building inspectors in general are well-rounded persons, and so also should be equipped with the technology and tools to meet a wide range of needs, and the equipment should be suited to clearly communicate findings to their clients. The camera features and specifications required for multiple applications and professional report production are vastly different than those needed for a weatherization professional seeking only to identify missing insulation and leaky windows. As a well-rounded building inspector, the infrared camera will most likely be used to identify not only weatherization concerns, but also moisture intrusion, electrical issues, HVAC system performance, system and component locations beneath finished surfaces, structural inspections, pest and vermin infestations, and much more. The images captured will most often be used in professional report generation as well.
A common misconception is that in general, residential and commercial building applications are significantly different in regards to infrared thermal imaging. In actuality, regardless of the building type, the application fundamentals and recommended thermal imaging equipment remain nearly identical for both! High resistance electrical connections occur in both commercial and residential electrical systems and do not necessarily require different equipment just because the voltages may not be the same. Water intrusion, air infiltration, and other weatherization concerns don’t require different thermal imaging cameras for residential and commercial buildings. For these building applications there is no such thing as an “entry level” camera. The simple truth is that if one quickly finds that their chosen camera lacks the specifications or features necessary for a commercial job and related report, it likely also lacks the same necessary features and specifications for the residential jobs they intend to perform.
Additionally, the short-sightedness of focusing your infrared services to strictly residential can severely limit the income potential of these services. Experienced thermographers can attest to the revenue differences between residential and commercial infrared jobs even though the actual services are quite similar. The commercial side, however, often brings more educated clients who typically require minimum equipment specifications and training levels in order to perform/provide the services they seek. These job specifications closely resemble the recommendations in this article.
Specs and Features for the Building Inspector
Resolution
It has been said time and again that an inspector should purchase an imager with the highest image quality and detector resolution possible. Image resolution and quality is determined by the focal plane array (FPA) sensor of the camera. Unlike digital cameras, the FPA is not adjustable. Building inspectors should consider the following when researching which camera best suits their individual needs:
Detector Image (FPA) Resolution
Most infrared cameras have fewer pixels than visible-light cameras have. It’s easy to confuse the display or output image resolution from the detector resolution. In fact, some manufacturers hide an inferior detector resolution by boasting bigger screen display or image output resolutions in their marketing materials. Higher image resolution cameras can measure smaller targets from greater distances with more accuracy. They also create sharper images for reports and marketing materials.
Building inspectors who will be providing infrared images in their reports should look for minimum 320 x 240 FPA resolution cameras. This is typically comparable to VGA quality visible-light photos provided by most digital cameras. Anything less often results in grainy and pixelated images that do not convey clear information. Higher resolution helps to provide for more accurate quantitative and sharper qualitative thermal imaging. This specification alone often narrows the choice of thermal imaging cameras significantly, but also places the field of choices in a higher cost bracket. Most of the lower cost cameras available today are deceptively marketed with infrared images from 320 x 240 FPA or higher resolution cameras.
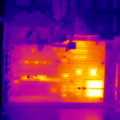
The following images of an identical subject help to illustrate the dramatic differences in accuracy and clarity between some common camera resolutions (images courtesy of FLIR). As the images progress in resolution, the visible detail of the subject, and measurement accuracy of the thermal exception improve substantially. In an electrical scan, the observed variance between resolutions can define the stark difference between alerting a client to an immediate repair concern and merely noting it for routine condition monitoring … a call that a thermographer would not want to get wrong.
 |
FLIR i3 – 60 x 60 pixels |
|
|
|
||
 |
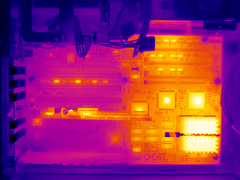
FLIR i7 – 120 x 120 pixels |
|
|
|
||
 |
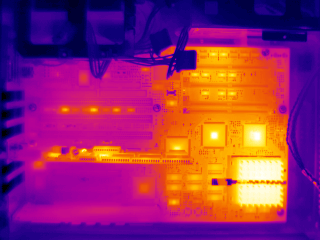
FLIR E50 – 240 x 180 pixels |
|
|
|
||
|
|
||
 |
FLIR T300 – 320 x 240 pixels |
|
|
|
||
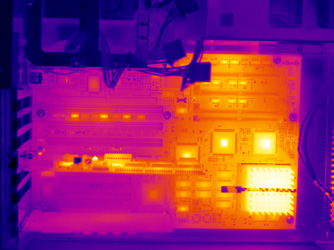 |
FLIR T640 – 640 x 480 pixels |
Thermal Sensitivity / Accuracy
Infrared cameras allow one to see differences in heat as well as measure these differences. The accuracy of these measurements is an extremely important factor to consider. Sensitivity is the smallest temperature difference between two objects that an IR camera can discern. This specification is typically stated as NETD (noise equivalent temperature differential) and measured in mK, °C, or both. Adequate sensitivity is often deemed as 100mK (0.10°C) and ±5% or 5°C accuracy. Excellent thermal sensitivity is considered 50mK (0.05°C) ±2% or 2°C accuracy. Essentially, the lower the number the better the sensitivity of the infrared camera.
The thermal sensitivity of the camera is especially important when considering the smallest temperature difference that will typically be measured as well as the climate region where the camera will primarily be used. We recommend general building inspectors look for an imager with 50mK or better sensitivity, especially if your primary business is located in a region with significant seasonal temperature changes like the U.S. Midwest. Conditions for accurate building envelope applications can become quite difficult in mild weather and the Spring and Autumn seasons in these regions where temperatures inside and out become quite similar throughout the day. While standards of practice recommend a minimum of 18 F° thermal differential (Delta T), practical environments are not always ideal or able to be manipulated to achieve these ideal conditions. In such circumstances, IR cameras with less sensitivity may prove inadequate for quality results. The better the sensitivity of your camera, the easier and better results you will have when performing services such as water intrusion identification and weatherization inspections in seasonal and mild temperature regions.
Range / Span
A camera’s temperature range is also important to consider. The range indicates the minimum and maximum temperatures a camera is able to measure. For most building related applications, an adequate temperature is generally considered to be -20°C to 150°C (-4°F to 302°F). On some occasions it may prove useful to have higher temperature ranges available such as -20°C to 250°C (-4°F to 482°F) or greater. Inspectors should select an IR camera with temperature ranges broad enough to measure temperatures that will be typically encountered in commercial and residential inspections.
Screen / Display
Screen display size and display resolution of the infrared camera are also important features to consider. Accurately identifying (in the field) a thermal exception the size of a softball on a 12′ x 8′ wall surface can prove quite difficult with a small camera display, let alone one with a poor display resolution. Larger screen sizes can help inspectors make the correct call in the field, rather than waiting to upload images for further analysis back at the office. We recommend a screen display size no smaller than 3 inches. Cameras with display sizes of 5 inches, 7 inches, or greater are, of course, easier to see and convey issues to clients who may be looking over your shoulder.
Another important feature is the display refresh rate. In the US, display rates of 9Hz and 60Hz are commonly available. 60Hz is similar to the display rates observed in most digital video recorders. What one views in a display with a 60Hz refresh rate is almost instantaneous with the movements of the camera and scanning motions of the operator. 9Hz refresh rates are very noticeably slower providing a visible delay effect in what is viewed in the display. Slower refresh rates can contribute significantly to the time required in scanning surfaces and proper focus of the image. As such, slower refresh rates can substantially add to field inspection times especially on larger jobs. Imagers with 60Hz refresh rates are recommended for building inspections.
Field Controls and Adjustment
An often overlooked feature of many infrared cameras is the ability to adjust settings such as emissivity, reflected temperature, span, etc. in or on the camera itself. The ability to compensate for actual conditions and adjust these settings in the field is ever so important for accuracy. Referring back to the images illustrating the differences in camera resolutions, accuracy of the temperature measurements could not be achieved without first compensating for such items as emissivity, reflected temperatures, span, and such. Most low cost and low resolution cameras do not have the ability to change the factory settings in the imager itself, thus lending to less accurate measurements. Building inspectors should look for field adjustable settings, and avoid cameras which do not offer these features.
Other helpful diagnostic features include multiple and moveable spot or area temperature measurements, adjustable isotherms, dew point alarms, multiple color palettes, and image annotations. These features will become more meaningful and important as the inspector progresses in experience and realizes the need.
Ergonomics / Durability
Infrared cameras are offered in a variety of shapes and sizes. The industry has evolved rapidly to offer more portable, efficient, hand-held cameras as compared to just a few decades ago. Cameras should be easy to manipulate around corners, objects, and odd angles as inspectors will often encounter such circumstances in the field. Some common model offerings include the simple “point and shoot” stick-type cameras, and cameras that have lens systems which tilt or rotate along an axis. Each style has its own unique drawbacks and benefits, and really becomes a matter of preference.
Cameras should also have easy to manipulate onboard controls. A few dedicated or programmable buttons is often preferred over models that require the user to step through a maze of menu options with a single button. Many cameras now offer an integrated touchscreen to simplify function access, annotations, and even offer sketch capability.
Camera weight can be another important concern. Often the inspector may be required to use the camera for extended periods of time. A lighter camera can reduce the operator’s physical strain (shoulder, neck, and back) during long inspections. A few ounces can make a world of difference to an operator using the camera for 4 hours straight!
Lastly, the camera should come equipped with multiple batteries that are quick and easy to change in the field. This allows the inspector to continue working efficiently with minimal interruption. Most camera batteries included with the imager will each provide 2-4 hours of continuous operation.
Recommended Optional Features
VLCM (Visible Light Camera Module)
Most building inspectors will need to present findings to their clients or other interested parties. Visible light (digital) images that correspond with the infrared images can help further document a concern and effectively communicate precise locations. Inexpensive thermal imagers often do not include an integral VLCM. In order to reduce inspection and reporting times, building inspectors should opt for an infrared camera that includes a VLCM.
Flash / LED Illumination Capability
To coincide with the VLCM feature, many cameras now include an onboard lamp that doubles as a visible light camera flash as well as a flashlight to illuminate dark areas. Flash / LED illumination is a nice feature to have in many IR applications.
PiP / Fusion
Infrared cameras that include a VLCM will also often incorporate a picture-in-picture (PiP) or IR/VLC blend or fusion feature. PiP allows the user to insert an IR image over the corresponding visible light photo. Fusion allows the user to “blend” a portion of the IR image together with the corresponding visible light photo to create a composite image, highlighting a thermal exception within a given structure or component. Fusion typically allows the user to choose how much of the visible light photo needs to be revealed, while PiP simply overlays a smaller IR image over a larger visible light photo. Both options are nice features to have for comprehensive report generation and marketing purposes.
Laser
It may seem commonplace, but a laser pointer feature is often omitted on several IR camera models. Laser pointers are important for several reasons, primarily for their use in directing the attention of an assistant or client to an object or area of concern without actually physically touching the component or surface during the inspection. The laser pointer is extremely useful during roof and electrical inspections for this reason.
Interchangeable Lenses
A preferred IR camera will have the optional capability of interchangeable lenses. Most imagers are provided with a standard 20mm or 25mm (actual angle or field of view can vary somewhat from manufacturer to manufacturer) lens. When compared to a standard digital camera, this is a noticeably more shallow field of view. Most inspectors will find the standard equipped lens to be satisfactory. However, some inspectors choose to purchase a wide-angle (10mm-15mm) lens to provide greater field of view which allows more of a surface to be scanned in a shorter amount of time. A wide angle lens also allows the operator to scan surfaces and components at shorter distances, often providing greater accuracy in measurement. Telephoto lenses are also available in various degrees of field of view. Telephoto lenses provide users the ability to scan targets from greater distances without the pixilation that often occurs with digital zoom.
Manual Focus
IR cameras are offered with fixed focus, automatic focus, and manual focus options. A camera with manual focus provides for operator controlled fine-tuning of the image and greater accuracy in temperature measurements. Automatic focus is controlled by the camera. While automatic focus is nice, it can quickly become cumbersome and slow to react when multiple objects at various distances are in the frame or field of view. Fixed focus (or sometimes offered as “focus free”) cameras are set at a specific focal length from the factory. Fixed focus cameras are less accurate for quantitative purposes and often do not perform well at short or close-up distances. Experienced thermographers tend to prefer manual focus over automatic and fixed focus cameras. Some cameras offer motorized focus control which can be difficult to manipulate accurately. A physical focus ring or manual tuning of the lens remains the preferred method for most seasoned thermographers.
Bluetooth / Wi-Fi
Some IR camera models offer Bluetooth compatibility with other Bluetooth capable equipment or measurement instruments. This feature provides for rapid wireless data transfer of vital diagnostic information to the IR camera which is then embedded into the corresponding image annotation and/or radiometric image data. Instruments such as moisture or clamp meters can be linked to the IR camera reducing the need for additional precise note taking in the field. The combined visual and quantitative data provides the necessary information to determine the urgency of needed repairs of concern items quickly, and can dramatically reduce report times.
Some camera manufacturers now offer Wi-Fi apps for compatible mobile devices. This feature allows operators to wirelessly connect the IR camera to mobile devices (such as smartphones and tablets) and import IR images for portable analysis, report generation, or simple sharing with clients or colleagues. As developments continue, even greater features are being created for additional functionality such as remote camera control, streaming video, and more!
Voice Annotation
Some cameras offer voice annotation which records a brief digital audio note spoken by the operator and embedded into the annotation data of the corresponding IR image. The audio recording can then be played back when reviewing or analyzing IR images in the office. Like the Bluetooth feature, voice annotation can reduce the need for written field notes substantially cutting inspection and report times.
Software
While camera features and specifications are extremely important, it’s also prudent that inspectors look at the included (and usually proprietary) reporting/analyzing software. Most clients will require documentation of findings in a building and infrared inspection. The information provided in a report is often used to substantiate repairs or initiate insurance claims. Most software included with the infrared camera will allow basic image analysis and simple report generation. Advanced software programs for more in- depth analysis and customizable reports are also made available. Some manufactures charge additional fees for advanced software, while others don’t. It’s important to review the provided software for your own needs and requirements, as well as ease of use. It also should be noted that a few third-party providers offer software and reporting solutions that are compatible with most currently available IR camera manufacturers. These offerings may be worth research and consideration as well.
Cost
As previously discussed, the price points of IR cameras vary dramatically based on specifications and included features. Ideally, cost should be one of the last points to consider when selecting an IR camera, but realistically, very few of us can claim that “money is no object”. Inspectors should approach an IR camera purchase armed with as much education and foresight as possible. Price points continue to fall, and what once was considered a “mid-range”, general inspection use IR camera was easily priced over $10,000 just a few short years ago. Similar cameras with even better features now available can be purchased as of this writing for between $5,000 and $8,000 new. Inspectors should set realistic and professional budgets for investment in their business. Thorough research and hands-on demonstrations are always recommended prior to making a selection and commitment. Just because less expensive models are available or continue to be released does not mean that the camera is ideal or aptly suited for general inspection work. They often fall far short of the mark. The old adage holds true that “the bitterness of poor quality lingers long after the sweetness of low cost is forgotten”.
Recommended Specifications and Features Guide*
|
Category
|
Spec or Feature
|
Weatherization Technician
|
Energy Auditor with Reports
|
Facility Maintenance
|
Electrical Inspections with Reports
|
General Inspection Use and Report Generation
|
|
Resolution
|
Less than 120×120 resolution
|
X
|
X
|
|||
|
120×120
|
X
|
X
|
X
|
|||
|
320×240
|
X
|
X
|
X
|
X
|
||
|
640×480 or better
|
X
|
X
|
X
|
X
|
||
|
Sensitivity
|
150mK
|
X
|
X
|
|||
|
100mK
|
X
|
X
|
X
|
|||
|
70mK
|
X
|
X
|
X
|
X
|
||
|
50mK or better
|
X
|
X
|
X
|
X
|
X
|
|
|
Temp Range
|
Up to 150°C (302°F)
|
X
|
X
|
X
|
X
|
X
|
|
250°C (482°F) or greater
|
X
|
X
|
X
|
|||
|
Camera Settings
|
Fixed Settings
|
X
|
X
|
X
|
||
|
Field Adjustable Settings
|
X
|
X
|
X
|
|||
|
Dislplay
|
9Hz display
|
X
|
X
|
X
|
||
|
60Hz display
|
X
|
X
|
||||
|
Optional
|
VLCM
|
X
|
X
|
X
|
||
|
Laser Pointer
|
X
|
X
|
X
|
|||
|
Flash/LED
|
X
|
X
|
||||
|
PiP
|
X
|
X
|
X
|
|||
|
Interchangeable lenses
|
X
|
X
|
||||
|
Manual Focus
|
X
|
X
|
||||
|
Fixed Focus
|
X
|
X
|
X
|
|||
|
Automated Focus
|
X
|
X
|
X
|
X
|
X
|
|
|
3-4 (or less) color palettes
|
X
|
X
|
X
|
|||
|
Less than 4 color palettes
|
X
|
X
|
X
|
X
|
X
|
* The above chart is considered a simplified recommend guide based on intended use or application of the IR camera and related specs or features. It is subjective in nature and will not cover all intended uses or applications of IR cameras.
Training
It can’t be stressed enough that proper training from knowledgeable, experienced, and respected sources is important. The fundamental information and education received from qualified trainers and reputable sources will provide much of the knowledge needed to make an educated purchase decision, as well as help to build a successful infrared inspection business. Again, most experienced and successful thermographers will recommend a minimum of Level-I infrared training/certification prior to making an equipment purchase. Most training and education providers do not require one to own infrared equipment in order to successfully complete their courses or certifications. While there are several reputable training providers, this author highly recommends Infraspection Institute® for their independent and unbiased course offerings, as well as their high quality of training, certification, and support services provided to thousands of thermographers worldwide. Please visithttps://www.infraspection.com/ for more information about Infraspection Institute® and their course offerings.
Conclusion
Knowledge is the key for success in this business. What one invests in their knowledge, training, and suitable equipment will determine how many doors can be opened with that key. Invest wisely, continue to learn and develop your skills, and welcome to the always amazing and ever growing field of infrared thermal inspections!

