Applying FEA to Perform Heat Transfer Calculations to Increase the Utility of IR Thermography

Jack M. Kleinfeld, P.E., Consulting Engineer
Kleinfeld Technical Services, Inc.
4011 Hillman Ave. Bronx, NY 10463
718-884-6644 / toll free: 866-884-6644 / 212-214-0919 fax and voice mail
www.KleinfeldTechnical.com
Abstract
Saying “FEA”, or Finite Element Analysis, brings a glazed look to most eyes, but call it heat transfer analysis and thermographers sit up and take note. This paper will present FEA for heat transfer analysis applications of interest to thermographers. Examples will be presented that show how FEA can be applied to make thermographers more efficient, more effective, and more informed of the implications of their results. Other applications will be outlined so that thermographers will be aware of when to consider having FEA done for their projects.
What is FEA?
FEA, or Finite Element Analysis, is a method for performing calculations of complex systems. It derives its name from the multiple, small elements used to break up the problem for analysis. It can be used where explicit solutions are not possible. It is most often used for mechanical system calculations, such as stress and strain, but is equally applicable to heat transfer, as well as other types of phenomena that can be described by the appropriate types of equations. These can include low and high frequency electromagnetic systems, dynamic response of objects or assemblies to vibration and shock, fatigue, and others. One branch of FEA, which is sometimes addressed by other calculation methods, is Computational Fluid Dynamics, or CFD. CFD is also of interest in heat transfer calculations where fluids are involved. CFD has not been used in the examples discussed here, although at least one of them would have benefited from it. CFD is often run in combination with heat transfer calculations, to give what is called a conjugate analysis.
While it can be set up and done by hand, FEA is usually performed by computer. There are many commercial codes for FEA available. Some are highly specialized, while others are more general. The examples presented here were done with general purpose programs that have the capability of doing stress/strain, heat transfer, dynamics, non-linear materials, and other types of calculations. Included in the heat transfer capability are conduction, convection, and radiation calculations. There is also a module that can be used for CFD.
Why do heat transfer analysis?
The processes and objects that are looked at by infrared thermographers are undergoing heat transfer and heat related phenomena. If they were not, there would be no reason for thermographers to look at them. By performing an analysis of their heat transfer behavior a better understanding of their characteristics is obtained. This improved understanding includes explanation of the significance of measured temperatures, determination of temperatures that are not available for measurement, determination of the time characteristics of a thermal event, and the prediction of the response to changes in the thermal process. Examples of these will be presented.
How FEA and heat transfer analysis affect thermography
By understanding the characteristics of the objects and thermal processes that they examine, thermographers can get better results, faster results, more reliable results, better understanding of their results, and, in some cases, results which would not be otherwise available. Thermographers can save time, money, and effort by using FEA at the right time and place. This makes them more effective, more productive, more efficient, more profitable, and more useful to their customers. FEA should be applied when the information it supplies will help the thermographer or their customers. The three examples in this paper point to some of these applications. Finite Element Analysis as a Tool for Thermography, Thermosense XXI, 19991 presents two other cases: estimation of the surface temperature above a buried, hot pipe as a guide to the ability to find it using IR, and suggestive of the ability to find a leak in it using IR; and estimation of the surface temperature response on a sample with an internal flaw in response to a square wave thermal pulse. The thermographer’s world includes steady state processes, such as hot electrical components or buried pipes, as well as transient or time dependent processes, such as solar heating and NDT using active IR. All of these can be modeled and examined with FEA. The results of the FEA examination can be used to judge when to work, to judge whether to work, to judge how to work, and to understand the results. They will tell the thermographer about things that cannot be seen.
What is required to perform FEA
The most basic requirement to accomplish FEA easily is a good FEA program. Many FEA programs include a physical modeling capability, or a CAD program. Some of them can import CAD information from other software packages. The FEA programs used here were Cosmos/M and Cosmos/Works. They were used in conjunction with SolidWorks, a 3D modeling program.
In addition, information about the system being simulated is needed. This includes the physical properties of the materials and information about the boundary conditions of the problem. The properties required are thermal conductivity for both steady state and transient problems, and heat capacity and density for transient problems. Boundary conditions specify how the objects in the simulation interact with their environment, for example, by convection to air, by receiving solar heating, or by radiating to a night sky.
Almost anyone can learn to use an FEA program, but not everyone should. In order to benefit from the FEA answers it is useful to have some assurance that they are correct. This will stem, in part, from an understanding of heat transfer phenomena, material properties, and system behavior on the part of the person performing the FEA. It is also a good idea to be able to afford the FEA system and generate enough use out of it for it to remain a familiar tool and one with good payback. A consulting and services firm or a large corporation are more logical places for the FEA analysis to reside than a strictly IR services firm. The IR firm can more profitably use FEA as provided from outside.
Examples
Both steady state and transient examples will be presented. In some cases, they have been simplified. In general, they have been prepared for presentation here, rather than as part of a specific project. The properties and boundary conditions have therefore been approximated where convenient.
Roof Moisture Survey
IR is used for qualitative surveys of roof moisture. ASTM standard C1153-902 describes desirable procedures and conditions for carrying out such surveys. One of the recommendations that it makes is that, in the event of overcast conditions, the roof survey should not be done unless the building is heated to 18° F above the outside temperature. FEA simulations were done to examine the impact of this requirement. The cases examined were:
- Wet and dry roof comparison for clear conditions, unheated buildings,
- Wet and dry roof comparison for cloudy conditions, unheated buildings, and
- Wet and dry roof comparison for cloudy conditions, heated buildings.
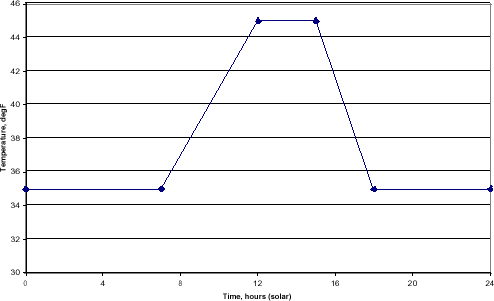
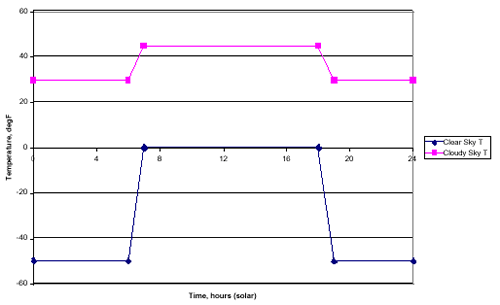
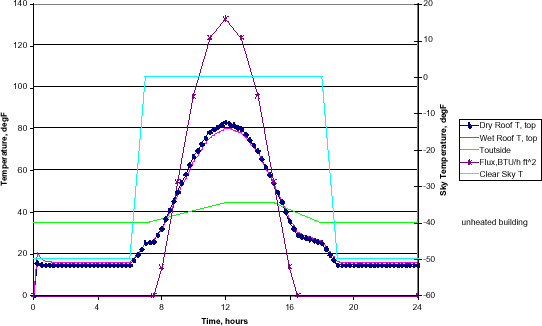
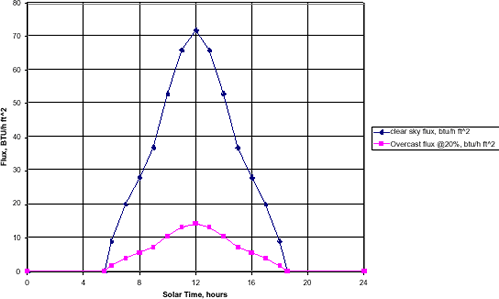
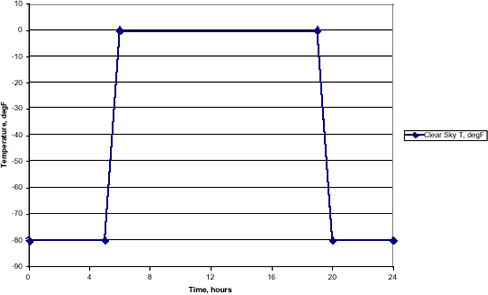
Conditions were taken as winter in NY. Solar flux data 3 and assumed air and sky temperatures are shown in the following figures. The air temperature was applied to convection from the outside surface of the roof for all cases and to the inside surface for unheated cases. A constant 65° F inside air temperature was used for the heated case.
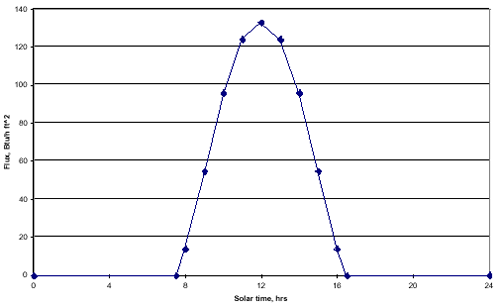
The roof characteristics were based on two inches (2″) of expanded polystyrene molded bead insulation board. The contribution of the membrane, roof deck, and air spaces between the roof deck and the insulation were all ignored as being minor. The wet section of roof was treated as polystyrene plus 10% by weight of water. The properties of the wet section were then approximated as being equal to the properties of the polystyrene plus 0.10 times the property of water. This gave, for example, a dry density of 1.0 lbm/ ft 3 and a wet density of 1.0 + 0.10* 62.4 = 7.24 lbm/ ft3 . The density is the most strongly affected property, because it has the greatest spread between the two materials. The others were treated similarly.
The response of the roof under the three conditions, clear sky, cloudy sky, and cloudy sky, but heated building, is shown in the following three figures. Note that the first 1-2 hours of the simulation should not be used, since that is the period during which the simulation is building its “starting” conditions. The swings shown in the temperatures during that time period are not real, merely a numerical artifact.
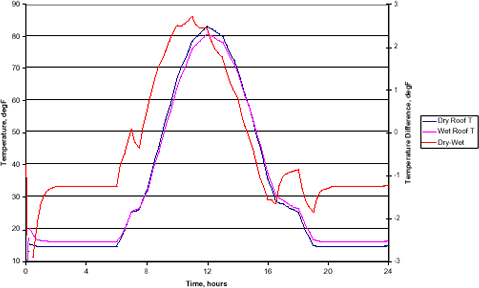
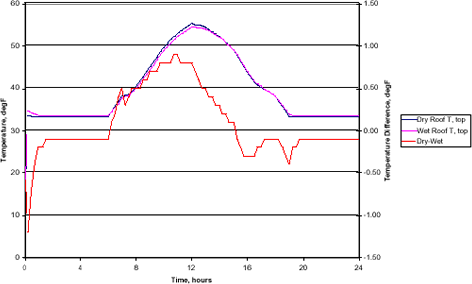
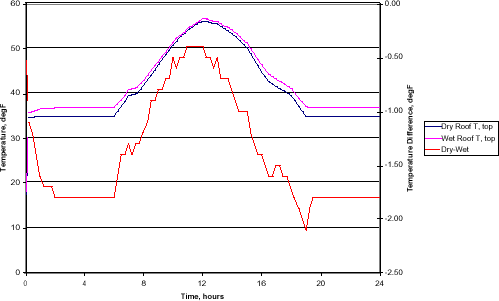
Under clear sky conditions, the thermal contrast between the dry and wet areas of the roof is more than sufficient to be seen using a standard IR camera. At mid-day, the dry areas are 2-3° F warmer than the wet areas. At night, the usual time that roof moisture surveys are conducted, from about 4PM to about 6AM the wet areas are 1-2° F warmer than the dry areas. The cloudy sky response is quite different. It still shows the surface of the roof getting warm during the day, only less so. It exhibits only a small thermal contrast between the dry and wet areas. At night the difference is less than 0.5° F. In the daytime, the maximum difference, occurring in the late morning, is less than 1.0° F. This would make detection of the wet areas much more difficult under these conditions. With the same cloudy environmental conditions, but with a heated building, the thermal contrast improves. At night, the contrast generally exceeds 1.5° F. The daytime contrast is not very good, with a maximum of about 0.5° F. It is interesting to note that the contrast in the cloudy, heated building case is always negative. That is, the wet areas are always warmer than the dry areas. The wet areas are losing more heat to the outside due to their greater surface temperature. In other words, this demonstrates that wet insulation does not work as well as dry.
The shape of the roof temperature response may not be exactly what the intuitive observer would expect. Why does it show the shoulders near sunrise and sunset? This can be explained by plotting the response together with the forcing functions, i. e., the time curves for flux and temperature, and by doing some brief calculations of the relative importance of the different factors. The following figure shows the clear sky case with the input data.
The events that occur around sunrise are changes in sky temperature, air temperature, and solar flux. Their timing is tabulated below.

Calculations of the heat flux to the roof (where positive values are roof gains) for each of the types of heat transfer: convective, radiative, and direct solar flux, were made and are tabulated below.

At 6 hours or 6AM, the sky temperature starts to rise and the roof responds. At 7, the sky temperature levels off and the air temperature starts to rise. The roof responds more strongly to the leveling of the sky temperature, but rises slowly due to the air temperature’s increasing. At 7.5, the solar flux begins, reaching 14 BTU/ h ft 2 °F by 8, and the roof temperatureagain begins to climb strongly in response. Note that the roof temperature soon exceeds the air temperature and the direction of convective heat transfer reverses, so that the roof starts heating the air.
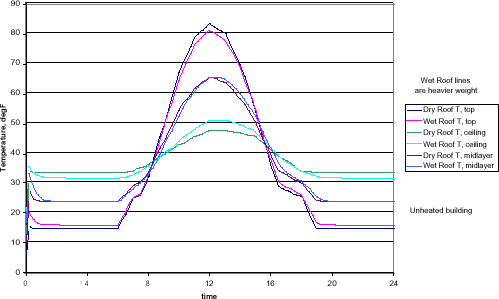
One other item of interest is available from the FEA results with little additional effort. The behavior of the underside and center of the roof as it cycles through the day can also be examined. Note that the center of the roof would not be available to thermographic inspection, so this is a purely calculated result that might be of use to the thermographer, the owner, or the roofing materials salesman or other thermographic customer. These are presented for the unheated building, clear sky case in the following figure.
Extending the FEA Use for Roof Moisture
An item that thermographers should consider is the potential for additional value to be gained by applying FEA to roof moisture surveys. For example, if a well documented survey were conducted in which the environmental conditions were measured, the roof’s actual temperatures were measured (rather than only imaged), and a limited number of moisture samples were taken, it should be possible to calibrate the FEA model and then, based on observed temperatures of the roof surface, actually report moisture content!
CMU wall
A common application for IR is to examine CMU walls for the presence or absence of pilasters. IR can detect the pilasters because they respond differently than the rest of the wall to the varying heat loads imposed on the wall. The heat loads that are of interest are: the solar load on the (outside) of the wall; the convection from each face of the wall; the radiative interchange between the wall and its surroundings, especially the sky and, in particular, the night sky; and the heat loadrepresented by any building heat that may be in place. The building heat is combined in the convective boundary condition on the inside of the wall. As with the roof moisture survey, essentially all of these loads vary over time, both on a daily basis and on a seasonal basis. The solar loading is very different in December than it is in July. Solar loading is also affected by location (latitude) and sky conditions, and also by the orientation of the wall. It can also be affected by the surroundings of the wall – trees, buildings, etc.
Diurnal temperature variations are also different, both seasonally and, to a lesser extent, day to day. What this means is that the wall’s observable thermal behavior varies in response to a great many inputs. It is sometimes enough to know where the wall is and its orientation in order to know the best time of day to get a good image and good thermal contrast between the pilasters and empty cells, especially if a wall like it, near it, and at the same time of year as it, has been examined before. If not, the thermographer may find himself, or herself, showing up at 9 PM to get the same great imaging that had been obtained before and being two hours late or five hours early.
FEA can provide an estimate of the wall’s behavior before going into the field. By using FEA ahead of time, the thermographer can arrive at the right time, get the best images, and leave in less time than might have been spent just waiting. They can certainly do it in less time than if they got there two hours late and had to wait eight to ten hours for good conditions to recur, or had to leave and come back. FEA is economical, and makes the thermographer more efficient, more effective, more productive, and more profitable.
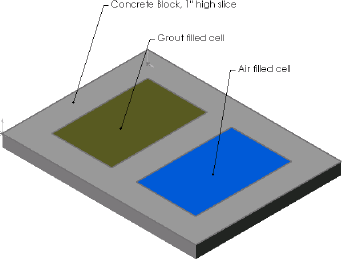
The CMU example is based on a wall with alternate cells filled with grout and a single thickness of block. Properties for the grout and block were approximated from literature values. Conditions were chosen to approximate central NC in mid-July in order to compare the FEA results with values published by Gregory Stockton and Lee Allen in Using Infrared Thermography to Determine the Presence & Correct Placement of Grouted Cells in Single-Width Concrete Masonry Unit (CMU) Walls at Thermosense XXI, 1999 4 . The exterior of the wall was treated as facing south.
Since the wall is essentially infinite in the vertical direction, that is, the heat transfer is in and out of the wall and to the left and right in the plane of the wall, but does not occur significantly in the vertical direction, only a small slice of a single block needs to be modeled. The next figure shows the block as modeled. The slice is one inch (1″) thick in the vertical direction. The thermographer can only see the long faces of the block that are 1″ thick, either the exterior or the interior. As shown, the exterior of the wall is the lower left face, so that the filled cell is on the thermographer’s left when viewing the exterior wall and on the thermographer’s right when viewing the interior wall. (The model was initially set up to work on the exterior face, but the results did not show a good match to the reported data. In conversations with Greg Stockton,
he pointed out that the measurements had been made from the interior.)
The boundary conditions (BCs) for the model are:
- Convection with the outside air from the exterior face to the outdoor air temperature,
- Convection with the interior air from the interior face to the interior air temperature,
- Solar flux on the exterior face,
- Radiation between the exterior face and the sky at the sky temperature, and
- Radiation between the interior face and the interior of the building, taken as equal to interior air temperature.
To use the BCs described above requires information about the environmental conditions: outside air temperature, inside air temperature, solar flux, sky temperature, and sky condition, all as a function of time of day. It was necessary to make assumptions about most of these. The solar flux has been based on literature values 5 for 32° North latitude, mid-July, for a southern elevation. Time plots of these input conditions are shown below.

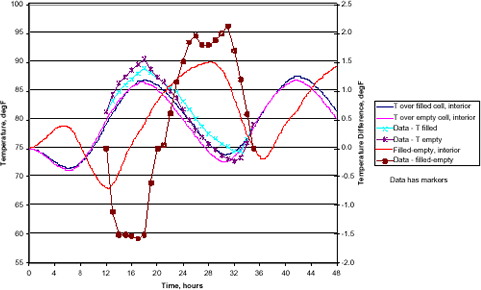
The data extracted from the plot in Stockton & Allen is shown below. Its lack of smoothness is due to the difficulty in reading precise values from the graph.
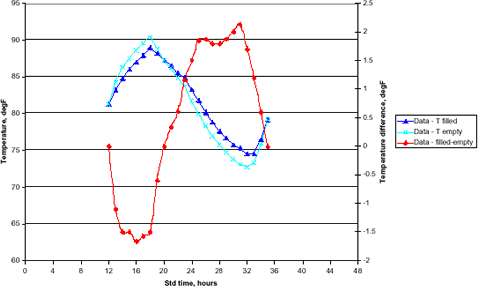
The results for the FEA simulation are shown below for the interior wall and again with the values extracted from Stockton & Allen for comparison. There is fairly good agreement between the simulation and the field data. The chief differences
between the simulation and the data are:
- There is an offset in time between the occurrences of the peaks in the data vs. the simulation, and
- The simulation shows a smaller range of thermal contrast (filled-empty) than the data.
The offset is easily explained, since several factors contribute to it. The two primary factors are the orientation of the wall and the difference between solar time, as used in the FEA, and clock time, as reported by Stockton & Allen. If the actual wall faced the SW rather than due S, it would exhibit later peaks. In addition, the time used here is solar time, as per ASHRAE. The data from the reference paper was corrected from daylight savings time back to standard time, but no correction was applied for longitude, which would affect the actual local solar time relative to the clock time. In addition, the time curves assumed for the environmental characteristics, especially temperatures will affect the timing of the calculated wall response. Obtaining actual values for the information, rather than using assumptions, would address these issues. Even with the assumptions and known problems, the FEA results are quite good and definitely valuable. They show when the separation between the filled and empty cell temperatures is at a maximum and would be imaged most easily and reliably. They could be readily extended to the other walls of the building to allow the thermographer to plan a “field campaign” while still in the office. The plan would address which walls to image at what times, and in what sequence.

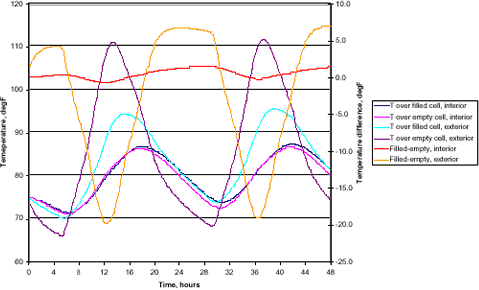
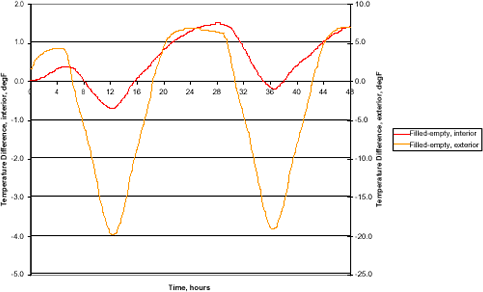
The following two figures present the results for the behavior of the exterior wall in combination with the results already seen for the interior. The exterior exhibits:
- Much wider temperature swings,
- Much higher temperatures,
- Much higher thermal contrast between the filled and empty cells, and
- Different timing for the temperature peaks.
This makes sense. The exterior is directly exposed to the primary loading, the solar flux. It receives this loading as soon as it occurs, whereas the interior wall experiences a lag due to the heat transfer through the wall. By performing this type of analysis for each wall in a structure, the best program for examining the entire structure could be determined before going into the field.
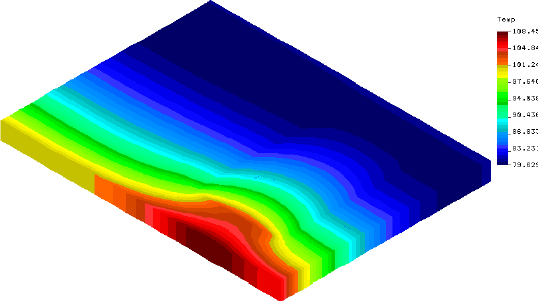
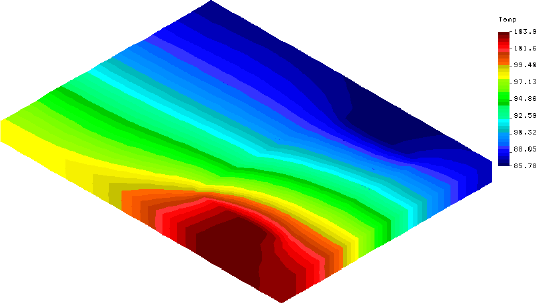
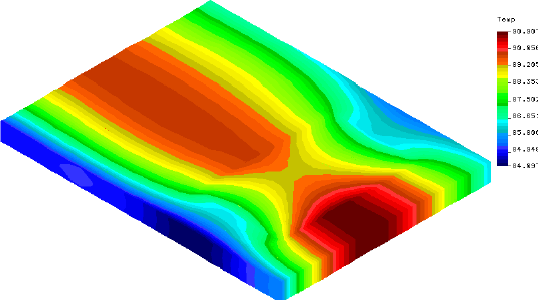
The FEA program can present its results graphically in a form that strongly resembles an IR thermograph. Images of this type are presented below in four-hour intervals starting at 24 hours, or midnight of the solar day Ð second cycle, and extending through the second day to 48 hours. Two types of thermal images are presented. The first is an isometric view of the concrete block, including its internals, which the thermographer would not be able to see. The second is the view of the one inch slice of the interior wall that was modeled and which corresponds to the view that the thermographer would have. Temperature scales have been adjusted for each image.
| Time | Isometric Image Thermal Step = 96 |
| 24 hours, midnight at start of second cycle | 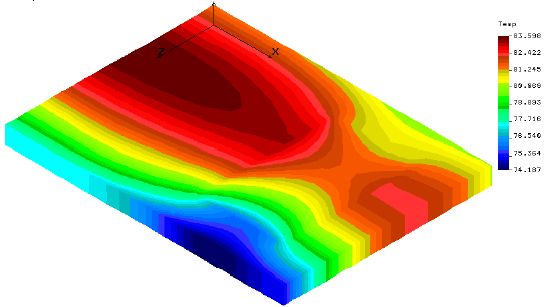 |
| Time | Isometric Image Thermal Step = 112 |
| 28 hours, 4AMConsiderable contrast between the filled and empty cell locations on both exterior and interior surfaces. The filled is hotter in both cases. | 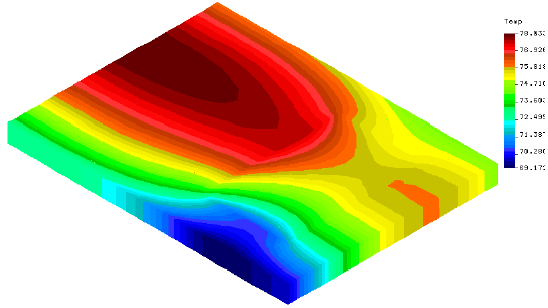 |
| Time | Isometric Image Thermal Step = 128 |
| 32 hours 8 AM | 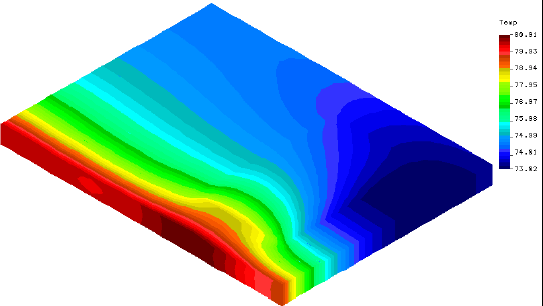 |
| Time | Isometric Image Thermal Step = 144 |
| 36 hours, noonAlmost no contrast on the interior surface. Considerable contrast on the exterior, with the empty cell much hotter.
|
 |
| Time | Isometric Image Thermal Step = 160 |
| 40 hours, 4 PMHigh contrast on the exterior, with the empty cell much hotter than the filled. Moderate contrast on the interior, with the empty cell cooler than the filled.
|
 |
| Time | Isometric Image Thermal Step = 176 |
| 44 hours, 8 PM
|
 |
| Time | Isometric Image Thermal Step = 192 |
| 48 hours, midnight
|
 |
| Time | Interior Wall – Thermographer’s View Images |
| Reference image from the interior, showing the cell locations, empty on the left, filled on the right |  |
| Time | Thermal Step = 98 |
| 24 hours, midnight at start of second cycly | 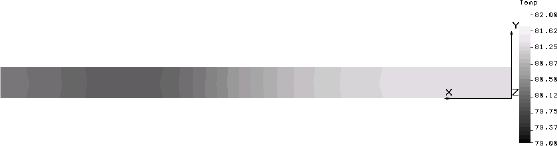 |
| Time | Thermal Step = 112 |
| 28 hours, 4 AM | 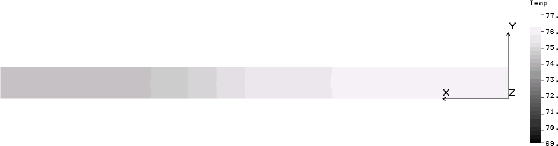 |
| Time | Thermal Step = 128 |
| 32 hours, 8 AM | 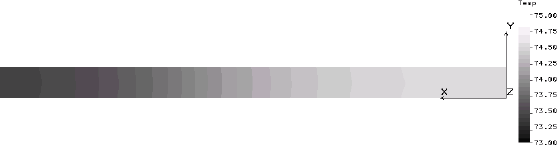 |
| Time | Thermal Step = 144 |
| 36 hours, noon | 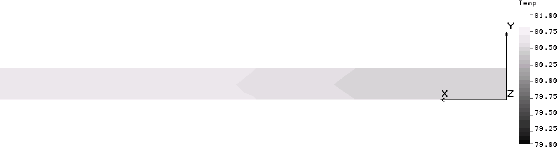 |
| Time | Thermal Step = 160 |
| 40 hours, 4 PM | 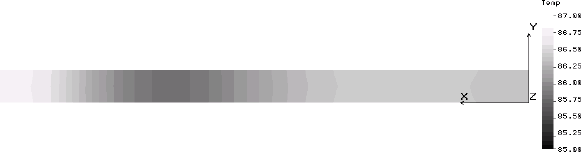 |
| Time | Thermal Step = 176 |
| 44 hours, 8 PM | 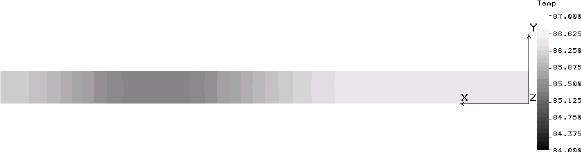 |
| Time | Thermal Step = 192 |
| 48 hours, midnight |  |
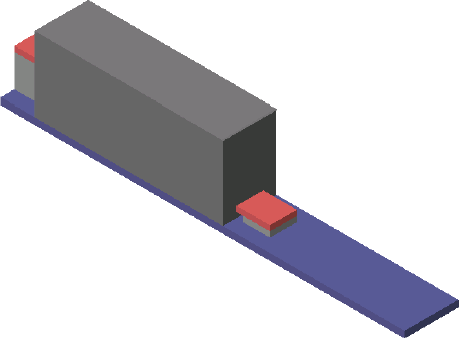
Internal Temperature of An Electrical Component
This is an example of calculating temperatures at surfaces or points that cannot be observed directly, but which are of interest because they represent the true conditions of the object. It is carried out as a steady state analysis, because it is assumed that there is no (short term) time component involved. The case presented is a sealed electrical component that shows mild heating on the surface when examined thermographically. The thermographer cannot directly measure the contact’s temperature in the component because it is sealed. The owner would much prefer making a shut down or keep running decision based on the contact’s temperature as opposed to the case temperature. The thermographer would like to oblige, but the camera will not help. FEA will.
For the example, a very simplified component was created, as shown below.
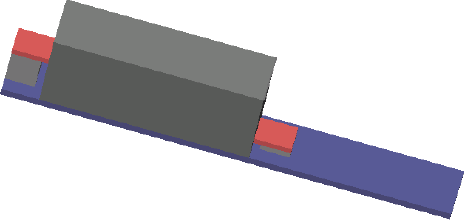
For the sake of expediency, some simplifications were made in preparing the FEA model. While they will certainly affect the values of temperatures obtained, they do not affect the principles demonstrated, i. e., that FEA will allow a calculation of temperatures unavailable for measurement. The simplifications made include:
- Radiation was omitted.
- Air circulation in the case cavity was omitted, i. e., a CFD module was not included in the modeling.
The lack of air circulation in the case tends to under-represent the flow of heat from the interior components to the inside of the case wall. This error was partially offset by increasing the thermal conductivity of the air.
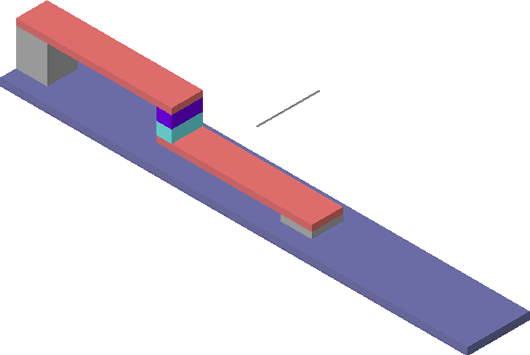
The thermal image of the component, as seen by the thermographer, resembles the FEA generated images below.
| Full Contactor-case 2-5W :: Thermal Time Step: 1 Units : Fahrenheit |
 |
| Full Contactor-case 2-5W :: Thermal Time Step: 1 Units : Fahrenheit |
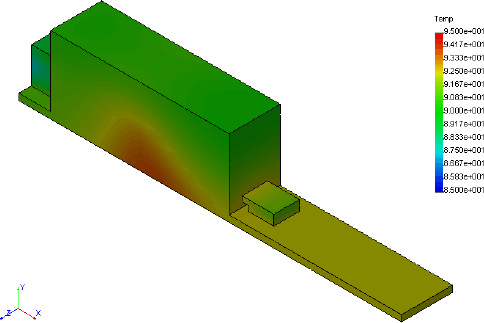 |
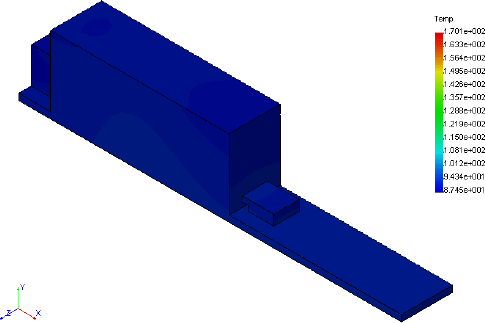
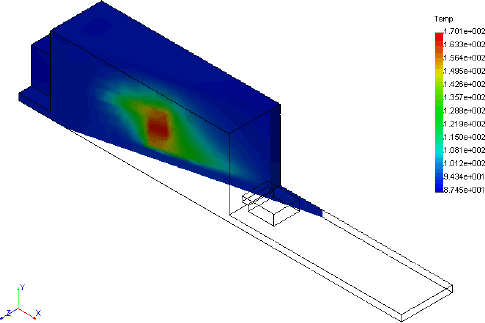
The ambient temperature used in this example is 70° F. The component shows a 15 to 25° F rise over ambient. Some localized heating is seen on the side of the case at the location of the contacts. Were air movement in the interior included, this hot spot would be less distinct and the rest of the case would be slightly warmer. The temperature rise of the exposed surfaces, when combined with areas of the surfaces, the ambient temperature, and typical heat transfer coefficients, provide an estimate of 5 watts of heat dissipation from the component. By careful measurement of these values, the thermographer would be able to provide this heat loss estimate to the customer based strictly on thermographic results. By then applying FEA, and by assigning the heat generation to the contact face between the two contact blocks shown as shades of blue in the interior figure, the temperature of the contacts can be calculated. This was done with the results shown below.
| Full Contactor-case 2-5W :: Thermal Time Step: 1 Units : Fahrenheit |
 |
| Full Contactor-case 2-5W :: Thermal Time Step: 1 Units : Fahrenheit |
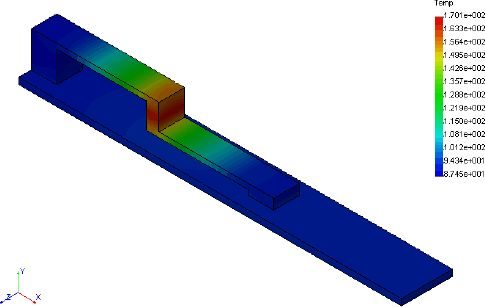 |
The contacts are at 170° F, or 100° F above ambient. This is significantly higher than the exterior temperature rise of 15-25° F. The value obtained is sensitive to materials of construction of the component, as well as the configuration of the component. For a real case in the field to be accurately calculated, the materials and the configuration, which is likely to be considerably more complicated, would be needed and would be reflected in the model. What is important in this example is the fact that using FEA allows the calculation of the interior, non-measurable, temperatures of the component. The fact that this particular configuration shows an incremental rise of 75° F over the exterior case temperature is almost incidental.
The same approach can, and should, be applied to other objects. These could be electrical components, mechanical components, process equipment, or structures. The application of FEA in this manner will make thermographers more effective. It will increase the level, type, and quality of information that they can provide.
Summary and Recommendations
The application of FEA for heat transfer calculations in both steady state and transient situations has been demonstrated. Used this way, FEA will provide information of value to the thermographer and the thermographer’s customer. The information can include estimates of temperatures that are not accessible to measurement, guidance as to the significance of measurements, and descriptions of temporal behavior of systems of interest. Practicing thermographers should be aware of these capabilities so that they can take advantage of them to improve their business, their profitability, the scope of jobs that they can perform, the type of customer that they can satisfy, and the time they spend providing results. FEA of this type
can be outsourced from various consulting organizations.
References
1 Kleinfeld, Jack M., Finite Element Analysis as a Tool for Thermography , Thermosense XXI, SPIE, Bellingham WA, 1999
2 ASTM C 1153-90 Standard Practice for the Location of Wet Insulation in Roofing Systems Using Infrared Imaging, ASTM, Philadelphia PA, 1990
3 1997 Fundamentals Handbook (I-P edition) , ASHRAE, 1997, Chapter 29, Table 18
4 Stockton, Gregory R. and Lee R. Allen, Using Infrared Thermography to Determine the Presence & Correct Placement of Grouted Cells in Single-Width Concrete Masonry Unit (CMU) Walls, Thermosense XXI, SPIE, Bellingham WA, 1999
5 1997 Fundamentals Handbook (I-P edition) , ASHRAE, 1997, Chapter 29, Table 17 29
Advertisement
