
James Brady
Level III Certified Infrared Thermographer
Brady Infrared Inspections, Inc.
935 Pine Castle CourtStuart, FL 34996Ph: 772-288-9884 www.bradyinfrared.com
Abstract
Since the 1970’s, thermal imaging has been utilized to diagnose the thermal performance of commercial and residential buildings. Rising energy prices combined with greater public awareness have created record demand for professional thermographers as building owners focus their attention on energy conservation and building performance.
Having a well thought out plan of execution, from selling the job to completing the final report will increase the likelihood of success when performing infrared inspections on large building complexes.
This paper details infrared inspections of a 1,500 room hotel and adjoining convention center with a combined total flat roof area of over 500,000 square feet and exterior wall heights in excess of 100 feet. To accomplish this project, a phased approach was used that included aerial infrared and follow-up walk-on roof inspections, exterior wall inspections, and interior inspections investigating specific problem areas.
Introduction
As infrared technology sweeps the building science market and specifically roof moisture surveying, thermographers are becoming increasingly exposed to buildings of various sizes and designs. While most building inspections can be successfully performed by “walk-on” surveys using handheld imagers, other projects through shear size and design are best performed using a phased approach that combines aerial infrared and walk-on infrared surveys.
Before becoming an infrared thermographer, I worked for a groundwater exploration company developing high-yield water wells. A typical project started with tracts of land 10 to 50 square miles in size, but occasionally we would have study areas over 400 square miles. All of these projects started with satellite and high altitude imagery to see overall site conditions. Phase-I objectives were to evaluate the study areas as a whole and select areas for future detailed analysis. Phase-II involved various detailed geophysical and mapping surveys in the selected areas to pinpoint drilling sites. Phase-III was the actual drilling and development of the well. The same type of phased program can be applied to large and complex buildings to assure that initial inspection efforts provide the best return on your client’s investment and also provide you a clear and concise road map of where future inspection work should be directed.
This talk presents a case study of a 1,500 room hotel and adjoining convention center with a combined total flat roof area of over 500,000 square feet and exterior wall heights in excess of 80 feet. To accomplish this project, a phased approach was used to inspected the roofs and walls. Phase-I of this project was an aerial infrared inspection of the flat roofs. Phase-II included walk-on surveys of the flat roofs to verify anomalies located on the aerial infrared imagery and board landscape imaging of the exterior walls. These two tasks worked well together as many of the roofs we accessed provided excellent vantage points to capture exterior wall images. Phase-III involved actual inspection of hotel rooms and other areas throughout the facility that were experiencing leaks.
Project Overview
This project originated from a client that I was marketing electrical surveys to back in 2006. During one of our meetings, I was asked to provide an infrared moisture inspection of their Exterior Finished Insulation System (EFIS) walls for long-term budgeting for waterproofing and painting. During this inspection we noted several thermal anomalies on various sections of flat roof we accessed to scan the walls. As part of our final report, we included the results of the limited roof surveys we performed. At the time of the survey, the roof was approximately 5 to 6 years old but it had undergone at least three hurricanes and/or tropical storms in 2004.
Fast forward to 2009 and we are again asked to provide an infrared inspection of the exterior walls. But before responding with a proposal, I set up a meeting with the client to review the results of our previous inspection and to emphasize the significance of the thermal anomalies we found on the roofs.
From that meeting I learned that they were experiencing widespread roof leaks throughout the facility. Furthermore, I learned that some of the leaks were occurring on middle and ground floor rooms. The meeting ended with the client having interest in looking at both the exterior walls and flat roofs in an attempt to solve their water intrusion problems.
The roof portion of this job presented the greatest challenge, encompassing an area of over 500,000 square feet and having eighteen different roofs at various levels. A large section of roof area, over 375,000 square feet, is wide open with few landmark features.
The remaining roofs are long narrow corridors with several AC units affixed on stands, large exhaust fans, penthouse mechanical rooms and bell towers. Given the size and complexity, I recommended that an aerial infrared survey be conducted to serve as a starting point to provide a general condition assessment of the various roofs. This would be followed up with a walk-on survey to verify and delineate anomalies and provide insight to causes of roof leaks.
The wall inspection part of this project presented its own challenges. Not only were the size and number of walls significant, but rain and overcast weather in the afternoons created less than ideal scanning conditions. Another problem I faced was off-set cooling and warming cycles of walls as determined by their physical location around the facility. My plan was to capture landscape portraits of wall sections during each night we would be performing our walk-on roof survey. This would provide a variety of wall images captured at different times under cooling conditions. For instance, one image of a wall may be captured thirty minutes after sunset one day and then on another scan taken three hours after sunset. By using this method first, I felt we would capture a wide range of thermal conditions for each wall area during their cooling stage. We would also scan walls from mid- to late morning and early afternoon to catch walls as they were under solar loading. Eventually, the goal was to move the wall inspection work to areas of suspected leaks and try to determine specific leak sites.
I estimated the project would take at least 45 days to complete factoring in frequent summer rain showers, scheduling an aerial infrared survey with report turn-around, and other project nuances. Additionally, the project manpower would consist of me and another thermographer working, by and large, independently at different times and on different aspects of the job.
Below are the generalized work tasks and calculated times for completion of the project, factoring in weather delays and other unforeseen setbacks:
|
Aerial Infrared Inspection |
Two weeks (flight and report turn-around) |
|
Walk-on Infrared Roof Survey |
5 nights |
|
Wall Infrared Survey |
7 to 10 days / nights |
|
Leak Site Investigations |
2 to 4 site visits |
|
Report Generation |
5 days |
During the planning and selling phase of this project, not once did I feel that the size or complexity of this job was too overwhelming to perform. Knowing that I would be relying on an aerial infrared survey to provide regional thermal patterns on the onset of this project, combined with our past experience of the wall inspection, I had confidence the program we had put into place would succeed. Obviously, so did our client as we were awarded the contract to commence.
Flat Roof Information
I divided the roof areas into South and North Roofs based upon roof construction differences. The following roof information, including layout, size, and construction information is listed below:
South Roofs
- Layout: 7 different elevations with 9 separate roof areas
- Size: 376,500 square feet
- Construction:
- Modified Bitumen
- Perlite Board Insulation
- Metal Deck
North Roofs
- Layout: 7 levels with 10 separate roof areas not including several balcony type roofs
- Size: 139,225 square feet
- Construction:
- Modified Bitumen
- Lightweight Concrete
- Structural Concrete Deck
Aerial Infrared Survey Methods
For the aerial infrared survey on this project I worked with AITSCAN who provided high-resolution black and white infrared imagery, color photograph imagery and color AutoCAD overlays.
The aerial infrared survey was completed using a fixed-winged aircraft with a high-resolution infrared camera mounted on the belly of a plane and flown at an altitude of approximately 1500 feet over the facility during the late evening hours. Several infrared images were captured and then “stitched” together to provide a composite thermogram of the roofs. The following day, the same flight pattern was repeated to capture visual control photographs.
Using both sets of images, an AutoCAD lay-over was generated that highlighted thermal anomalies thought to be of significance. Areas showing the strongest thermal fingerprints were rated as “Probable Wet Areas”. Areas that showed up as amorphous shaped patterns with moderate to weak thermal signatures ended up being defined as “Possible Wet Areas”.
Aerial Infrared Survey Results
The results of the aerial infrared imaging on the South Roofs showed thermal anomalies that were generally defined as rectangular and square areas typical of wet board insulation (Figure 1). A total of forty-six anomalies were identified and marked on the AutoCAD map.
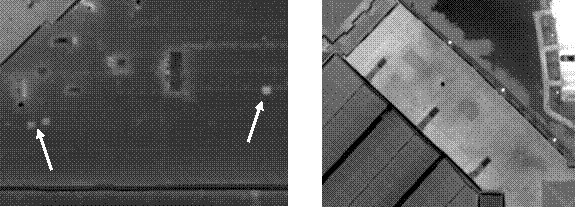
Figure 1: Aerial infrared image on left showing thermal patterns observed on board insulated roof (white arrows are typical anomalies observed).
Figure 2: Aerial infrared image on right showing thermal patterns observed on a typical lightweight concrete roof.
The aerial infrared imaging on the North Roofs showed an entirely different picture, characterized by a washed-out, mottled thermal pattern (Figure 2). It was suspected but not known with certainty that the lightweight concrete in the roof design was responsible for the thermal patterns we were seeing. After consulting with AITSCAN, only a few areas were marked as “Possible Wet Areas”, however, there was suspicion that large sections of roof could be holding moisture.
Walk-on Roof Infrared Surveys
Following the review of the aerial infrared inspection results, each roof was walked with a handheld infrared camera to verify the anomalies flagged as significant features on the aerial images. If the anomalies were deemed significant and typical of wet insulation, the boundary of the area was highlighted with high-visibility paint.
Areas that turned out to be false positive anomalies were noted and updated on the AutoCAD layover.
A delta temperature near 10 degrees F, from the daytime high temperature of low to mid-90’s degrees F and scan time temperatures in the mid-80’s degree F. During the summer in Florida, it is very seldom that you get a noticeable Delta-T until well after midnight, and even then the cooling process is very gradual. With that being said, we found that a workable scanning window opened shortly after sunset and became better as the evening proceeded.
A total of six evenings / days were spent verifying and marking anomalies; one day more than initially planned. The roofs were scanned by a walk-on survey using two different infrared cameras.
Camera Selections
The North Roofs Results with this camera were excellent as board insulation overlain by modified roof membrane posed no confusion regarding thermal anomaly patterns.
The South Roofs were scanned using a short-wave focal plane array FLIR ThermaCAM PM390 with a 32-degree wide angle lens. An emissivity setting of 1.00 was set on both imagers to conduct the surveys. I cannot express enough how big a fan I am of short-wave thermal imagers to scan roofs with light-weight concrete as the insulation and moisture holding medium. Images appear “warmer” and less congested than the counterpart long-wave cameras on these roof types that typically have very small delta-temperature anomalies throughout the entire roof.
South Roofs Results
Of the total 46 thermal anomalies identified on the North Roofs through the aerial infrared scan, nine turned out to be something other than wet insulation, and three new anomalies were added (Figure 3). Using aerial infrared imagery to locate and verify aerial thermal anomalies was straightforward and highly efficient. So much so that over 350,000 square feet of roof area was scanned in a single evening by one thermographer. Using the aerial infrared images as a guide, areas of identified anomalies were evaluated both thermally and visually.
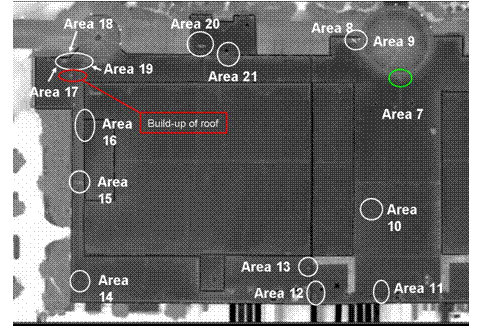
Figure 3: Aerial infrared image showing a select number of anomalies classified as verified areas (white circles), false positive areas (red circle), and added areas (green circle) after being inspected by a walk-on survey with a hand-held infrared camera.
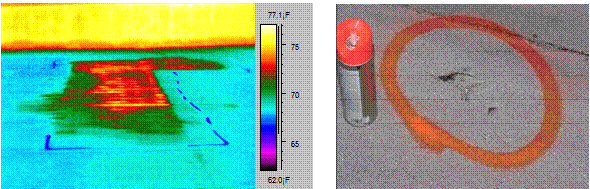
Thermal anomalies indicative of wet board insulation were labeled on the roof and photographed for the report. In general, they showed rectangular to somewhat rectangular thermal patterns on the roof surface (Figure 4a). Moisture verification testing was not conducted on any of the anomalies found; however, in several places punctures and other signs of damage were documented within the boundary of an anomaly (Figure 4).
Other occurrences of verified anomalies showed up around pitch pan flashings, AC units and parapet wall related issues. A few of these examples are shown in Figure 5 below.
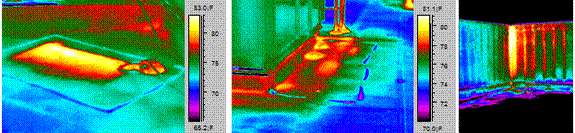
Figure 5: Left infrared image shows anomaly derived from defective pitch pan seal; middle image shows trapped moisture along AC curb; right image shows possible trapped moisture in parapet wall that is entering flat roof.
Anomalies that were caused by factors other than trapped moisture were separated out and marked as false positive areas. These included, 1) accumulated piles of roof granules as shown in Figure 6; 2) built-up sections of roof material; 3) small roof penetrations (Figure 6); and 4) unexplained anomaly; where nothing obvious was observed with the handheld infrared camera.

Figure 6: Area of accumulated roof granules (red circle on infrared image) that produced a thermal anomaly observed on the aerial infrared imaging. Arrow in right Figure shows footprint in granule pile
Three new anomalies were documented during the walk-on survey. These areas did not produce a strong enough thermal pattern to be readily observed on the aerial imagery (Figure 7), or were overshadowed by artificial heat sources on the roof (one roof had several stream vents and pipes).
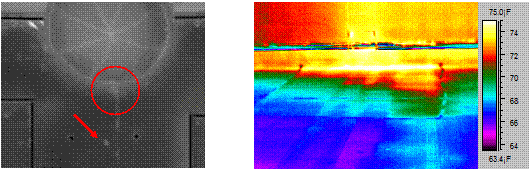
Figure 7: Thermal anomaly previously not indentified on aerial imagery marked on roof following walk-on survey. Red arrow shows a roof penetration that was initially labeled as an anomaly on the aerial infrared survey.
North Roofs Results
By intention, very few areas were marked on the aerial imaging on the North Roofs as the thermal patterns did not lend themselves to such straightforward interpretation. Rather, it was to wait for the results of the walk-on survey before marking final wet areas.
The walk-on survey images showed good correlation with the aerial imagery; a large portion of the roofs had elevated thermal signatures that displayed a mottled pattern. Having the ability to colorize the walk-on imaging helped define the thermal patterns. However, good correlation existed between the aerial and walk-on survey as shown in Figures 8 & 9 below.
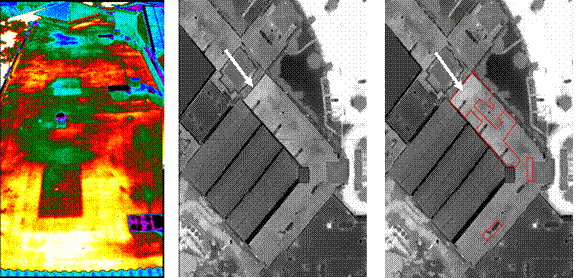
Figure 8: Left image – color infrared walk-on roof image; Middle image – unmarked aerial black & white image (white arrow shows look direction of color infrared image); Right image – aerial black & white with anomalies marked on map (red areas).
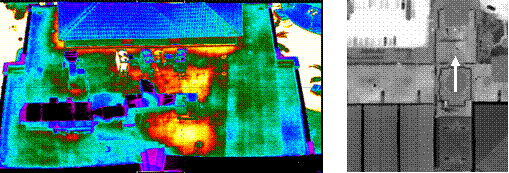
Figure 9: Left image – color infrared walk-on roof image; Right image – aerial black & white infrared image (white arrow shows look direction of color infrared walk-on image).
The walk-on survey helped us locate, up close, some of the causes for the thermal anomalies. The underlying insulation is lightweight concrete, which when installed has high moisture by weight content. Therefore, it was expected that some slight thermal differences may still exist as relic installation moisture. A few moisture probe tests were conducted at anomalies using a Delmhorst B2100 probe set on the comparative scale. Our intention was to see if the comparative moisture readings correlated with various thermal intensities on the roof. We found 99.9% comparative moisture at the warmest anomalies, 70% along the border and transition areas of anomalies, and 45% comparative moisture in areas of roof that showed no abnormal thermal pattern.
A majority of anomalies were correlated with HVAC equipment stands, lightning ground wire attachment points, window washing anchors, plumbing stacks and vents, and along wall/roof joins (Figure 10). Some anomalies occurred within the roofing field and may represent remnant moisture left behind during installation.
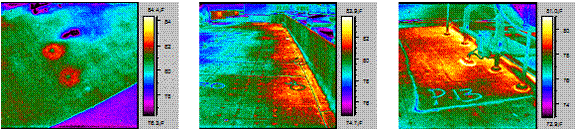
Figure 10: Left image – two circular anomalies around window washing anchors; Middle image – anomalies along a parapet wall; Right image – anomaly around AC stand flashing pans.
Miscellaneous Roofs
Some roof sections did not show up very well or were completely missed during the aerial infrared survey. This was no fault of anyone, but rather the lack of a direct line of sight to the roofs by the infrared camera flown above. These roofs were either small roof sections or roof sections that were tucked close to the buildings and sometimes protected by overhanging balconies from above.
These roof areas, if accessible, were scanned with hand-held imagers.
Final Remarks on Aerial and Walk-on Infrared Roof Survey
Having an aerial roof survey in-hand prior to performing a walk-on survey proved invaluable. It provided us the following benefits:
- Provided a big-picture assessment of the roof areas
- Help to allocate labor time and access efforts to various roof levels
- Expedited walk-on roof survey time by filtering out large sections of roof that had no problems
- Expedited walk-on survey time by focusing our efforts on areas with thermal anomalies
- Provided a sound perception of professionalism and expertise of our company to the client
Exterior Wall Inspection
The initial stages of the infrared wall inspection were conducted while performing the walk-on roof surveys. Most of the roofs provided ideal vantage points to scan large sections of walls. It would be very common to scan available walls sections prior to starting a roof survey, scan the same wall sections in the middle of the survey and have one final look before leaving the roof.
Given the fickle summer weather in Florida, it was nearly impossible to predict scan results from one day to the next. I found that one day produced excellent scanning and the following day not so good results.
Some of the problems facing this inspection included:
- Afternoon thunderstorms, even though not directly overhead, quickly cooled air temperatures and retarded complete solar loading on west facing walls
- The same thunderstorms accelerated cooled of east facing walls; shortening or completely ruining available scan time on these walls
- Finding the right time of day to scan north and east facing walls required patience, as some sections of higher walls captured solar energy while other walls never did; walls were scanned late morning, early afternoon and late evening
- Several balconies, overhangs and other architectural moldings on the walls created shadows that greatly decreased wall sections available to thorough and complete thermal analysis
While no magic formula was used to determine start or stop times for scanning, it became apparent that patience to scan at various times on various wall sections ultimately produced results.
Exterior Wall Inspection Methods
The walls were scanned with a long-wave focal plane array FLIR P-25 camera with a standard 24-degree lens and 12-degree lens. One evening I had the fortune to use FLIR’s new high resolution camera, P660; needless to say the imaging was very impressive.
It was decided to baseline image wall sections regardless if thermal anomalies were obvious or not. This was accomplished by capturing multiple shots and later stitching them together to produce a composite image as shown in Figure 11. Once post-processed, the thermograms were reviewed and anomalies indentified. This proved especially helpful to compare thermograms of identical wall sections taken at different times. It also proved useful to indentify anomalies that were not apparent during the actual scan. Figure 11 shows a cold anomaly on the wall that was initially missed in the field but was then followed up with close-up imaging as shown in Figure 12.
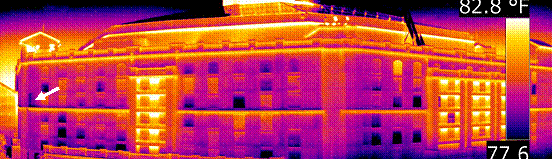
Figure 11: Composite infrared image made up of 6 separate infrared images. White arrow shows a cold anomaly that was initially missed during the field inspection.
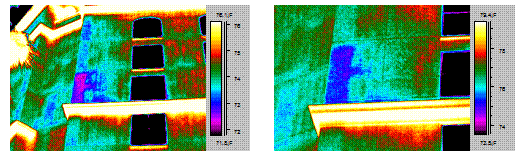
Figure 12: Close-up thermograms of cold anomaly shown in Figure 11.
Exterior Wall Information
The follow information is a generalized concept of wall construction:
- EFIS – Exterior Finish Insulated System attached to
- Exterior finish coating
- Mesh fabric over
- Foam-board
- Densboard, attached to
- Concrete columns and load bearing walls with metal stud framing
Exterior Wall Inspection Results
Numerous thermal anomalies were documented throughout the various wall sections that most likely depicted trapped moisture in the EFIS insulation board.
Water entry into the EFIS system was observed to occur in the following ways:
- caulk joint failure
- physical damage to the wall
- other flashing details tying into the wall system
- faulty / leaking gutter and roof drains
Common places anomalies where found included:
- Between panels of both side-by-side and intersecting walls, especially on inside corner walls
- Parapet wall coping, both metal and foam tying into walls
- Attachment points of foam molding details
- Ceilings and walls along gutters and roof drains
Anomalies were both cold and warm depending upon the time of day a thermogram was captured and the nature of water occurrence in the walls. Deep-seated trapped moisture in the EFIS showed up as warm anomalies when imaged under cooling conditions and cold spots when walls were warming Figure 13.
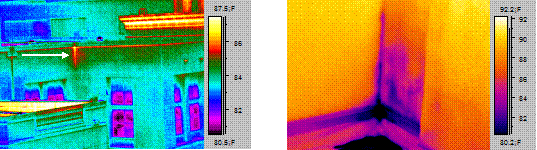
Figure 13: Right infrared images shows a linear hot spot along a caulk joint just below the parapet wall; Left image shows a close-up shot of a cold anomaly in the corner of wall just above the stucco-stop wall / roof flashing.
Following rain events, thermal anomalies showed up as cold spots along and between failing and weak caulk joints. Examples of these anomalies are shown in Figure 14.
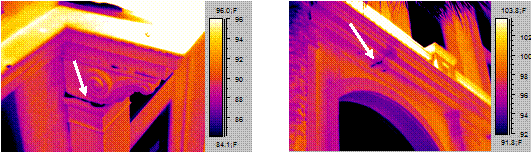
Figure 14: Cold anomalies of trapped water exploiting weak and degraded caulk seams.
Finally, leaky roof drains and gutter systems produced cold anomalies following rain events are shown in Figure 15.
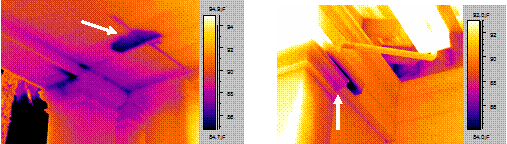
Figure 15: Cold anomalies from leaking roof drain and gutter system.
Interior Wall Inspections
During my initial meeting with the client, it was learned that leaks were reported in some of the hotel rooms on middle and lower floors. As part of this project, a list of rooms was given to us to scan with hopes of finding the cause of water intrusion. One feature all of these rooms had in common was an attached balcony on the exterior facing wall. The balconies ranged in size from small decorative eyebrow-type features to ones that could be accessed through windows. The floors of the balconies were a single-ply white roof membrane mechanically attached to a metal deck.
Thermal anomalies observed were always cold spots that appeared along baseboards and spilled out into the carpet (Figure 16). In one room, we were afforded the ability to access the balcony and discovered a thermal anomaly on the roof leading the exterior wall of the room, suggesting that a roof leak was causing the interior leak (Figure 17).
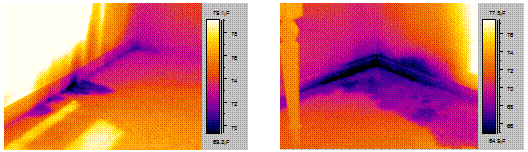
Figure 16: Cold anomalies along baseboards and carpet.
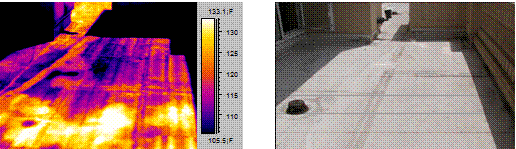
Figure 17: A cold thermal anomaly on a balcony roof captured in the middle of the morning as the roof was warming. The visual photograph shows the location of the hotel room’s exterior wall and window – the location of the interior leak.
Access to other balconies was not available or practical during this inspection, however, the consistent pattern of anomalies observed in each of the hotel rooms led us and our client to believe that the interior leaks were originating from balcony floor/roof defects. It should be noted that the balcony roofs did not show up on the initial aerial infrared scan because of their small and narrow size. Also, their close proximity to the building with numerous overhangs from above made them nearly invisible.
Conclusions
A phased approach that utilizes aerial infrared together with walk-on infrared surveys has shown to be an effective way to perform thermal inspections on large and complex buildings and roofs.
Aerial imagery was successfully utilized to provide regional condition assessments of roofs and help direct follow-up walk-on inspection efforts. In the absence of an aerial infrared survey, the walk-on inspection would have been more time consuming and would have provided extremely myopic images of large and complex roof areas; an unwise spend of money and most likely to only confuse the client with a long report.
Providing a follow-up, walk-on survey to the aerial was not only valuable but necessary, and should be considered by anyone hiring and aerial infrared survey. The walk-on survey verified anomalies, found new and discarded suspected anomalies, and provided insight into the causes of the anomalies.
Baseline and stitching infrared images of large wall sections provided comparison of thermal conditions of identical wall sections at different times. This was invaluable during this survey; scan results varied from day to day to reflect unsettled summer weather in Florida. It also indentified anomalies that were missed in the field after the images were post processed to adjust level, span, and color palettes.
As the infrared industry continues to prove itself in the building science field, large and complex buildings will be inspected. Using a multi-discipline and phased approach should help these efforts.
Visit out Sponsors:
![]()
Electrophysics